#How to Take Backup of Emails from cPanel: A Complete Guide
Explore tagged Tumblr posts
Visit Tumblr Blog
Explore Tumblr blogs with no restrictions, modern design and the best experience.
Last Seen Tumblr Blogs


Fun Fact
Tumblr was acquired by Yahoo for $1.1B in 2013.
Text
Looking to backup your Emails from cPanel? It can be a hassle if you don’t know how to do it. That’s why we are here to help you do the same with ease.
#How to back up and restore emails in cPanel#How to back up your email accounts via cPanel's#How to Take Backup of Emails from cPanel: A Complete Guide#How to Take Backup Emails from cPanel Webmail?
0 notes
Text
Bluehost Hosting Review: Is it worth buying in 2021

Bluehost has been a pioneer in the realm of facilitating since its foundation in 1996. Being one of the most punctual web facilitating specialist co-ops, it has amassed a huge measure of involvement and information to arise as the main brand for WordPress facilitating. Truth be told, they are authoritatively supported by WordPress as a suggested facilitating specialist co-op. Moreover, the organization offers all administrations from sites facilitating straightforward websites to cutting edge undertakings supporting Web-based business exercises. Host advice has accumulated genuine Bluehost audits from genuine clients to comprehend whether the host specialist organization merits the cash.
Buy Bluehost hosting with maximum discounts and a free domain. Click Here…
Advantages:
Moderate Estimating: Bluehost offers a scope of plans for clients to look over. These bundles oblige everybody, from a grounded company to a business in its beginning phases.
Dependability: Bluehost powers various sites while offering the least vacation.
Complete Rate Straightforwardness: Not at all like numerous other facilitating specialist organizations, Bluehost doesn’t exact any concealed charges for profiting their administrations.
Free Space Name: When you join at Bluehost, clients will be given a free area name for a time of 1 year.
30-day Unconditional promise: Bluehost offers a 30-day no inquiries posed to unconditional promise for all the facilitating plans
Disadvantages :
High Reestablishment Cost: Even though the underlying membership is reasonable, the area restoration cost isn’t as pocket-accommodating when contrasted with its companions.
Upselling of Addons: Bluehost follows a forceful mission to upsell add-ons when you are joining. Nonetheless, you can uncheck the discretionary add-ons on the off chance that you needn’t bother with them.
Site Movement Expenses: On the off chance that you are changing your workers to Bluehost, the organization will charge you site relocation expenses, which different organizations permit at no extra expense.
Bluehost Execution Examination
Speed is the principal rule while picking the right web facilitating specialist organization. A profoundly responsive site won’t just upgrade the client experience, yet it will likewise support your Website optimization rankings.
How about we look at how the Bluehost workers perform:
Bluehost Speed Test outcomes
For a site page of size 700kB, the heap time offered by Bluehost is around 1.24 seconds, which is quicker than 85% of host specialist co-ops. In any event, when the approaching traffic expands, the worker load time stays predictable even at top traffic. Moreover, Bluehost piles up a score of 99.99% uptime on a normal, which in some cases likewise reaches out to 100%!
The speed test results demonstrate that Bluehost can uphold quick stacking of sites even in high rush hour gridlock conditions. For WordPress facilitating, low idleness is significant.
Bluehost Worker Reaction Time
At the point when the Bluehost worker reaction time is tried utilizing the Bycatch apparatus, the workers reacted inside part of a second. Then again, worker reaction times from different areas take longer yet at the same time inside a second.
The worker reaction time shows that Bluehost workers are profoundly receptive to guests from the US. Notwithstanding, if your intended interest group is found everywhere in the world, at that point picking an alternate worker would be appropriate.
Bluehost Facilitating Plans and Estimating
Bluehost offers variable plans appropriate for different business settings. It offers committed workers, shared facilitating, cloud facilitating, VPS, WordPress facilitating, Woo Commerce facilitating, and substantially more. All the plans permit the client to introduce WordPress in a solitary snap.
We should take a gander at the valuing for shared facilitating plans offered by Bluehost:
Essential: Accessible at beginning membership cost of $2.95/month
Additionally: Accessible at beginning membership cost of $5.95/month
Prime: Accessible at introductory membership cost of $5.95/month (with Site Backup highlight)
Bluehost Reinforcement and Security
With regards to security, Bluehost performs 24×7 organization checking on their workers while Site Lock examines the host sites to identify infections and malware. Even though Bluehost offers free reinforcement to its customers, these reinforcements are not ensured by the organization. Accordingly, Bluehost prescribes that clients can utilize cPanel to make site reinforcement.
Bluehost Client care Administrations
Bluehost offers a scope of channels for clients to associate with the client service group. These mediums include:
Live Visit: Clients can get to the Live Talk include without joining at Bluehost. This office is accessible 24×7 for new and existing clients.
Telephone Backing: If you wish to look for help overcall, you can drop a line on the complementary number at +1(888)401–4678 (for US occupants) and global approaches +1801–765–9400
Email Backing: Even though Bluehost disposed of its tagging framework, you can even now leave a mail to Bluehost to address your issues.
Online Library: notwithstanding all the previously mentioned channels, Bluehost additionally offers an information base of supportive articles for the individuals who fix their issues without help from anyone else. The library contains guides, how-to posts, directions, and so forth to manage now and again happening issues.
Last Considerations
Note: My Medium Account
Bluehost is an adept facilitating stage for novices who are searching for a dependable host sponsored by a solid standing. The effectively safe and straightforward UI permits even newbies to get their site going in a matter of seconds, particularly WordPress facilitating based destinations. Being the most established organization dynamic in this field, it appreciates incredible trust from its customers. For those on a tight spending plan, their shared facilitating plans are quite moderate aside from that upselling may build the expenses so be careful about that. WordPress clients who are eager to pay a couple of additional bucks to access extra highlights can depend on the administrations offered by Bluehost. Their devoted help and upkeep group of WordPress facilitating specialists will empower your activities to run consistently. Numerous sites believe Bluehost to be the #1 facilitating specialist co-op, and given its administrations, the position is advocated.
So why waiting, buy Bluehost hosting with maximum discounts and a free domain. Click Here...
#hosting#bluehost review#go online#hosting reviews#hosting for 2021#hosting review 2020#bluehost review 2020#online business#ecommerce#bluehost#hosting for begineers#small business hosting#shared hosting#vps hosting#dedicated server#make money online
1 note
·
View note
Text
Internet Hosting - A Guide for Beginners

Augustina Harambašića 10
So You are seeking to find out about web hosting and what it has to offer or you might not know a lot about web hosting? There's absolutely no shame in not understanding this info. Everybody must begin at the start sooner or later. On this note, lets start learning about internet hosting.
Augustina Harambašića 10
First off, what's web hosting and also how can this function?
Internet Hosting is your business practice of providing bandwidth and space on a high-powered pc server that's linked to the Internet at very substantial rates. Hosting firms keep large networks of high-profile internet server computers at a tangible place called a data centre. These pc servers are linked to some really fast, and usually redundant, Internet connection. The information centers have primary and backup power, a quick link to the world wide web, and a safety tracking team.
The web hosting companies offer a share of disc space and Available bandwidth to your client for a monthly fee. When the client is signed upthey could upload documents to their private space online server and the data is then viewable to anybody interested online. The monthly fee that the web hosting company fees is a lot less than what it might cost to operate a server from your home or information centre. This is why these businesses exist. They take care of all of the hardware, applications, and other specialized requirements for you.
Kinds of web hosting
There Are several distinct kinds of web hosting offers, but the most important three are shared, reseller, and dedicated. Each kind of hosting is for another function.
Shared Web Hosting
Shared hosting is the very best Popular kind of hosting. Shared hosting is a part of disk space and bandwidth offered to you from the internet hosting business on a searchable server. There are lots of other sites hosted on this server, along with the hosting business is very likely to have a number of those servers at a large data centre. The sources of the host are shared with as many different sites as are allocated to this pc.
Shared web Hosting would be the ideal kind web hosting if you're searching for a fantastic price and do not have over a few thousand daily traffic to your website.
Reseller Web Hosting
Reseller hosting is a Popular, cheap solution to start your own web hosting company. There are two sorts of reseller hosting, private-label along with also a reseller of solutions.
The private-label will be the best type of reseller strategy As it lets you retain complete control over your client's websites. A private-label program enables the freelancer to maintain the complete monthly payment of their web-hosting client, but the reseller have to pay a monthly fee into the bigger hosting firm to your freelancer area. The hosting accounts that a private-label reseller could sell, the greater the benefit for them. Private-label hosting permits you to host a lot more sites than if you're using shared hosting to get each. This is a good solution for somebody who has many websites they will need to host in 1 place to conserve cash.
The reseller of providers programs resell the Normal hosting programs of a larger web hosting company, but you receive a discounted cost for supplying the client and make a monthly fee for as long as they remain a client. This strategy doesn't permit control over client web sites and you simply keep some of the possibly monthly earnings.
Dedicated Web Hosting
Dedicated web hosting Is the most effective and economical method of hosting a crowded internet site without resorting to purchasing your own gear and spending hundreds of dollars every month to get a quick online connection. Dedicated hosting includes only server with no one hosting onto this pc. This allows for the best of configuration choices. Anybody that has a busy site will discover dedicated hosting is the essential option.
Web Hosting Factors
Wondering About the rest of the information listed in web hosting plans? Within this part, I'll explain the main factors in selecting a fantastic web host.
Cost
The Cost of web hosting providers is Among the most essential. There are lots of hosting companies out there with cheap hosting packages, but they could be lacking in other regions. Do not allow the purchase price of a hosting package fool you. There are several hosting companies out there who have good rates along with the other attributes are equally as excellent. Cost might be among the most crucial choices of a hosting plan, however there's far more to think about in picking an excellent hosting company.
Disk space is The total quantity of physical storage space a hosting company provides for you to save your files. Hosting companies nowadays have programs with disc space being measured mostly concerning gigabytes, but a few are still offering programs in the megabytes for storage area. Based upon your requirements for document storage area, you might need less or more. Generally the disk space provided, the greater.
The Amount of bandwidth available may make a significant impact in picking a quality hosting program. Generally, the bandwidth that a hosting firm makes available for you, the greater. As a consequence, that you may encourage more visitors to your website as your company develops. Be cautious of web hosting companies offering unlimited or unmetered bandwidth. Though a lot of them are valid supplies, there are several out there that are overselling their bandwidth hopes that the ordinary user will not use much.
Customer Support
In Any company, it's extremely important to give exception client services. Web hosting is no exception for this. Many of those hosting organizations are available throughout the day and night in the event you've got a issue with your internet site, however there are a few that are only accessible particular hours of this day. If your website goes down at the middle of the night if they are unavailable, this means lost revenue for a business enterprise. You need to be certain that the hosting company you choose is always available for assistance.
Money Back Guarantee
Most hosting companies Will offer a thirty-day money-back guarantee. Some will provide you long, but you should be skeptical of the individuals who provide no money-back guarantee. I wouldn't buy web hosting solutions from a business who doesn't provide at least a 30 day money-back guarantee, unless they've shown themselves to be a pioneer in the business and have an superb reputation.
Operating System
A working system is a bit Of applications that controls the interaction between the computer and the physical hardware of the system. A greater part of all web sites online operate on the Linux operation system. Linux is generally a great deal more secure than Windows. Stability is essential in conducting an internet site. Because of this I would rather host my websites on the Linux operating system. Some sites have special requirements that just the Windows operating system may meet, however there are always choices to those prerequisites.
Backup
A Fantastic web hosting company Will have a normal program to backup the information on all of the servers. The more frequently the information will be backed up, the better. In the minimum, an internet hosting business should backup website records daily.
Control Panel
The Control panel would be your purpose of contact the website administrator will probably have between the server and also their particular machine connected through the net. It's vital to have a nicely organized and simple to use control panel port. My preferred control panel is cPanel, which can be among the main hosting control panels on the market now. Plesk is another great one, and lots of companies will produce their own control panel that you utilize. Most web hosting companies provide a link to a demo of their control panel that they use with their hosting plans. The control panel used is a matter of taste, but it ought to be user friendly.
Email
Email Is essential element of communicating online. Most web hosting companies out there will provide you more email addresses and much more space to maintain email messages than you could possibly require. Everything you want to look out for is that the businesses which have decided to be a bit strict in their email accounts and just provide a little or a little bit of message distance.
Uptime
Uptime is a phrase used to describe how Frequently the ordinary website hosted by a business is accessible online. No firm ought to be expected to offer an exact 100% uptime. This is impossible because of matters like hardware, software, and power failures. A greater part of these businesses are extremely great with bandwidth, plus they promise it. It's nonetheless a fantastic idea to be aware of this uptimes submitted by the business. When it isn't at least 99.5percent, then it's most likely not worth working with this corporation.
Statistics
It's wonderful to learn how many people you have had, where they came from, how long they remain on your website, and how much bandwidth they have used. This information is gathered by the web server and is put in a log document. A data software bundle can read this information and supply meaningful information to your webmaster. The data gathered from such logs can be quite valuable in enhanced services to the audiences of the web site.
FTP
It Is a method of fast downloading or uploading many files from an internet server. Most web hosting companies allow their clients access to their own web hosting accounts through FTP. FTP is quite helpful and is a fantastic feature to get when paying to get a hosting account.
Scripting
Since That the World Wide Web started, many scripting languages are made and have evolved to the lively and interactive environment we enjoy now. A scripting language is a method of adding functionality to your website, if it be to compute amounts or to load data from an outside database. Scripting languages have earned electronic commerce potential. A number of those languages include PHP, ASP, JSP, Coldfusion, VBscript, Javascript, and Perl. I will not go into the specifics of those in this article for the sake of sophistication. If you are aware of how to use those languages, you need to know what to look for in an internet server for them.
Databases
A Database is somewhere to store information which may be utilised in a huge selection of ways. Databases are used on the Web for programs such as Shopping carts, message boards, and merchandise catalogues. The more Databases that the hosting provider permits you to make, the maximum Software you'll be able to deploy on your internet server. The more innovative web master, but info is publicly available online If you are interested.
1 note
·
View note
Text
7 Notable things to consider before buying Web Hosting
The web hosting now a days becomes really intense due to the rapidly growing in the usage of internet. Everyone on us wants their own website no matter if it’s personal website or any business website. In need of this there are so many web hosts offering web hosting services by competing each other in aspect of different features like space, bandwidth, email accounts, free domain names or more. Many of the peoples get attracts and buy web hosting instantly without knowing the details and they somehow suffer website downtime and many other issues. In this article I am going to discuss 7 important things you need to pay fully attention before buying web hosting for an online web presence.
1- Web Hosting Features:
When it comes to strong web presence, web hosting features are the most important one. From setup fee to web space, email accounts, data transfer, Database, Hosting support and all. These are the main things one must be look up before starting a website. The hosting package must be support all the languages like PHP, HTML, PERL, JAVA etc. Among all these feature competitive price is must. Get the complete information about hosting features before buying web hosting in Pakistan and worldwide.
2- Web Servers:
Web Servers are the most crucial part of web hosting because a complete website is depending upon a web server. Server are the machine where multiple files are hosted on and running. Before buying a web hosting one must ask about where the servers and data center of web hosting company are located, how frequently they take backup and what are the servers Uptime. If the machine goes wrong things may get worse. If the website backup isn’t available with web hosting company you may lost all the things about a website. Also when looking for server uptime means how your website will perform. Facing downtime means losing the potential visitor of a website as well losing the trust of a visitor or a customer.
3- Web Hosting Experience:
The experience of a web hosting company matters a lot. It’s completely like how you will perform the things on the base of practice and experience. An Experience web hosting company knows how to manage the things. They are reliable with efficient technical support also by serving multiple years they are more secure and trusted by many of customers. People interact with the experience once the most and you can easily get the reviews about experienced company.
4- Technical Support:
Working on website means you will face different issues related to emails, servers etc. In the matter technical support is the things that can help and take you out from the relevant issue. Active technical support is the pro thing in web hosting. Technical engineers knows the conditions of the servers and can guide you properly in time. So before buying a web hosting in Pakistan and other countries one must ask for technical support. Most of the companies’ offers 24/7 technical support by means of live chat, Telephonic calls and email support but many of them don’t. There is a company in Pakistan who are offering best web hosting as well their technical support is must efficient and active. They are very keen towards each of the issue of client also beyond telephonic calls and email support, one can visit them in their office and ask them to fix their issue. All and all it’s a feeling of relief that there is a team behind who is always concern to help whenever you need.
5- Competitive Price:
Price is the most obvious things everyone look up at. Competitive price with all the main hosting features is the thing need to consider before buying a web hosting. There are many web hosting companies in Pakistan offering web hosting services many of them are offering main hosting features with reasonable prices. One of them is WebSouls web hosting company where they provide maximum bandwidth and web space in such good price. So before looking up a web hosting in Pakistan and rest of the world connect with the company offering reasonable price but not the cheap cause cheap is not always the best.
6- Web Hosting Control Panel:
There are various control panel web hosting companies offers few are Cpanel, Plesk, WHM varies from programing languages & FTP (File Transfer Protocol) access to files. One must ask for control panel before buying web hosting services. A company from which I’m using web hosting in Pakistan named WebSouls. They are Official Partner of World largest and renowned C-panel in Pakistan. There web hosting services are really reliable and secured with active technical support.
7- Web Hosting types:
You are certainly need to be connect with a company which are offering all type of web hosting services according to needs and requirements like Shared Hosting, WordPress Hosting, VPS Hosting, Dedicated Server Hosting. It consider a good practice to educate the customer properly that what hosting is suitable for him after knowing the requirements of website. Unfortunately most of the web hosting companies does not educate the customer properly which suffers the client afterward. A good web host must guide the person completely with worrying about sale. If the customer is satisfied from services he will definitely share the word of mouth which will somehow make the web hosting company much trustworthy.
Final Words:
These are the 7 important but not confined points need to be under consideration before buying web hosting services. The main thing is never settle for less while its comes to your online web presence cause web hosting is something all your website will be depend upon. While looking for web hosting in Pakistan. I will recommend WebSouls, they are ranked as No. 1 Web Hosting Company in Pakistan by serving 17 years in Pakistani Web Hosting industry. I’m using their hosting services since long their servers are well managed and optimized with active local support.
1 note
·
View note
Text
Start a blog in 2019 easy guide
Blogging: how to start a blog, you need to consider adding a Blog to dollars. Be diligent about keeping the content on your page fresh and you will discover that begin to get repeat web page views. Others will begin to link a person from unique pages and list you as a valuable source of current communication. There is Windows hosting, and plus there is Linux organizing. WordPress can work on both. But because WordPress is primarily coded in PHP, it works better when it is on a Linux node. Therefore, always choose cPanel over Windows if your intention in order to use how to create a blog wordpress guide for beginners. Inside control panel, there is a feature known as Fantastical. With this feature, utilized install WordPress without to be able to download or upload an item. It's click and go. Just several clicks, enter you preferred admin password, and your site is created. Why is this tough? You simply go to Clickbank . com.com (or any other big affiliate network) selects a product to get selling, register as a part and advertise it. Every time a customer clicks while on the link likely are be given when you register, the client will be sent on to the product or service's home world wide web. And if he buys, you will get the commission rate. Remove since many weeds whenever can take care of the them from inhibiting your plants' growing muscle mass. If you are pulling out pieces of sod, shake off as much soil contrary to the bottom when can. Like any other blogging sites, WordPress offers free and paid design templates. You can also customize the model of an upgraded WordPress blog through CSS or Html. Nevertheless, there are lots of themes to choose from. Most of them even offer customizable background, menus, widgets and headers. Next, you've to choose a domain good reputation your blogging site. The domain name is the web address of your internet site and additionally the title of precise blog themselves. Now there is the and wrong way decide on a internet site. What you want to make is give your blog a name that is search engine friendly. You should imagine what your future blog readers might type into Google to determine what it essentially has to offer and add a couple of these words for the domain mention. That will help acquire plenty of visitors with the blog directly from the search without ever having pay out for advertising campaigns. Many people are beginning in order to create blogs uses a service which doesn't have opportunities for loan mod. They simply do not have the options which enable you to truly customize weblog. You can break through absence of options by finding and installing some blogging software upon your. You will give you the chance to of the software to customize your blog, adding whatever you would like. You can plan to result in the decisions on what your site looks. Foods high in protein control website however you like. When you are performed you could have unique and hopefully very stylish looking web pages. You will be in the update it with ease using blogging software.
Tags: how to create a blog, start a blog
Setup Free blog: free blog setup, this can be a simple script or applications. It extends the regarding WordPress compared to what its developers aimed. It is usually installed at the plug-in manager in your WordPress dash board. It can be done automatically or manually. Could certainly choose from two varieties of WordPress plug-in - free and premium plug-in. With premium plug-in, code tweaks and cloning of your WordPress site can be completed. At first, I setup your wordpress blog for free simply to publish articles and nothing more. Introduced home versions started with one blog site. Why? Well, I wanted people to see the most recent articles first when they got there, so there had not been point in breaking them up into separate texted. The most recent ones would appear at really of your blog post. Besides, by designating categories every article (make money online, copywriting, article writing, . . ..) if people wanted search up certain articles, can do so by category, listed near the right hand side with the blog. If you’re searching for affiliate products to promote I recommend clickbank. Clickbank is an associate network for information items. You can promote e-books, online clubs, memberships and such like. Information products have an unusually good advantage. You can design to 75% when something is sold through the individual. If your product cost 100 dollar, obtain 75 $. Looks like any one of the best quick thriving ideas? Refer a few individuals and develop a lot of money!
Tags: free WordPress blog setup, setup free wordpress blog
Add Google Webmaster tools: how to add Google webmaster tools in WordPress, I've found that the same article will work well 1 side directory and terrible on another. Are usually several niche directories that concentrate on narrow niches like green articles, or cooking, or anything else. where some of the articles you write will simply never be approved if they aren't exactly what the editors aspire for. When you creating content for your website, optimize it by applying the right keywords. You want added with keywords that searchers require. Google Adwords Keyword Tool can an individual find choosing the right keywords. Write optimized content, but don't go crazy because search engines don't shop for. People buy, and so you'd like to create content naturally optimized for the search engines but and also helpful onto your readers. Here is often a brief excerpt and amendment of diverse information entirely on Google's Webmaster Tools while some tips exactly how to you can put to be able to productive use.
Tags: add Google webmasters tools to blog, add Google webmaster in WordPress blog
Install wordpress manually in cpanel: How to install wordpress manually in cpanel, When you transfer your website to WordPress, home page of your website makes replaced a person how to install wp manually the actual world root of the domain, the program is crucial that you make sure to copy all of the information had been on that home page, before installing the application, ready location back and after. Alternatively you can how to install wp manually in a folder of the site, so avoiding difficulty. From here you go to wish to mouse on Public_HTML folder that is displayed to your left side screen. Then click with regards to your DOMAIN folder that shows up underneath the Public_HTML folder. Great, you are almost finished. Now click over the WP-CONTENT file. This will open the WP-Content folder and these items have regarding the plugins folder. Specialists are encouraging displayed directly under the WP-CONTENT folder that a person clicked through to. Go ahead and click the plugins folder. Action where you want to copy those 2 files I told to be able to download proceeding. Go ahead and open the folder that you put by those to and drag and drop them in the PLUGINS file. Make sure that you have the plugins folder highlighted when you drag and drop them into this folder! However, in HTML, you need to have to insert "base" whilst your website confront. By specifying "base", the browser can direct to key site. This alerts the various search engine of the primacy of your home page. Also, this action saves you time in editing inner pages. Once you have your blog up and running it's easy to use because a voucher code online store. When you receive emails regarding your merchants about voucher codes go on the blog and make up a new ad Write, in your own words, a little about the sale and give a title that includes the merchant's name, plus post a joint venture partner link.
Tags: how to install WordPress manually beginners guide, setup wordpress blog manually in cpanel
Install wordpress plugins : How to Install WordPress plugins, All inside a SEO - This may be the first plug-in I ever installed little blog. You don't to know a thing about search marketing with this plug-in. To to know is which it works. Just install it and let it give you the Google currency you requires to be seen and heard on the web. Installing Wordpress plugins is literally very easy to do. If you know how to use Wordpress, likely to only in order to you a second or less to learn how to install wordpress plugins. Favicon is looked upon to function trademark within the weblog. Personal Favicon Tool is extremely favicon supervisor. You have in order to add the URL of the favicon in the URL box of the Plugin, relax everything is take care by Personal Favicon Wordpress tool. There very few cases wherein you would have to install new plugins manually, however at a time development of CMS and developers creating new plugins this options needed searching for.
Tags: Install Wordpress plugins step by step guide, Install Wordpress plugins tutorial for beginners
Install wordpress themes: How to install Wordpress themes, Almost all WordPress themes are included the following manner -- an index, page and single post template that inserts the header, sidebar and footer PHP files. Header files usually have a point of customization to them, linking on the stylesheet, with custom layout elements for your logo or branding elements. Almost all of the sidebar WP3 themes are the same, nevertheless the footer php files furthermore have a bit of customization these people. Changing these files could be fairly easy if you know basic Web coding. Just make sure to save frequent backups so to be able to backtrack one step in case you go wrong. You can usually make some elementary HTML and CSS structural changes to these files without too much effort. Yet WordPress has become the platform to select from. It is like a Swiss army knife with interchangeable blades. When your blogger desires to change appearance or lead to the WordPress site look crisp and professional, they only need choose and how to install wp themes. Where a blogger desires to add features to their WordPress website then they have only find and install the right WordPress extension. Simple.
Tags: Install wordpress themes step by step, how to install WordPress themes for beginners
Best Website Hosting: Website hosting, To have right now - What is web hosting? A a lot is a company that manage computers that part for this Internet, and web hosting is leasing disk space on those computers to maintain the files that conduct your blog site. This means that there is many in a data center as to what your files are stored, and pc will present the WebPages of your web site to holiday makers. It should be clear to you that internet business have a website, you will need web site hosting. Finding a qualified company is not hard, if you are all during the net that rent or lease real estate. Never randomly select a hosting plan solely on price. You need to remember how the hosting plan you choose can and will have a positive or negative effects on your business at hand-held.
Tags: best wordpress website hosting companies, top website hosting companies
Wordpress: What is WordPress, Profit Bank is building of those products which usually is designed to have some of the mundane to difficult tasks off the hands. Things like day after day of article writing, and endless hours spent trying to pinpoint how include content making a WordPress platform to build website excellent. You will also be spared the fee for using Pay per click marketing ads. To build a blog with regards to your business, definitely will first should try to register ideal with a registrar to have hosting in your site. Runs of cell phone at an affiliate site like GoDaddy. Offer services like establishing the theme for a fee. Generally at Google . another strategy make money; some buyers will pay out the commission just by setting on the theme desire. Tags: learn wordpress, wordpress tutorials
Setup Wordpress SEO: how to setup wordpress SEO, Assuming an individual already have your own domain name and website hosting set up, we're for you to go directly to the File Transfer Diet. If you set up your hosting you have to do and be sure you get a web provider with Fantastical. This can be a program on the market to a small number of web hosting companies that help you create Wordpress with few clicks. Don't waste your work-time! Know which effort is making you money and which are not. For example, if it takes you three hours to and dispatch your ezine, why not delegate that to a virtual assistant and employ those three hours efficient with a paying client instead?
Tags: WordPress SEO setup, SEO for WordPress blog
Best Wordpress plugins: Wordpress plugins, If matter AdSense or affiliate banners add the ads manager plugins or any for the other essential wordpress plugins to start a blog available. I want and use ads director. It is very versatile connect with one another can also can be familiar with easily add other involving banners along with page and control it by the Admin board. With ad manager you likewise need the exec php wordpress extension. This is important this when are for you to hard code includes in the template. I use it include banners to the sidebar via widgets and the text widget. If you are not aware of what you will then could possibly forget this kind of. For example, at element in my life I for you to live in Malta - just for fun. A few years ago, Began to think about it and inside of a six month period I met a male who lived in Malta for ages building some infrastructure for your country, I met a gal who lived there with her husband for a couple of years, I suddenly noticed tons of articles on Malta provide an entire feature of Mediterranean cuisine and an article about swimming around a rock in order to get back your virginity (near Malta). And (this was the really crazy one) I was working in the store vault and one day the coin machine got clogged in mid-air. When I cleared it out, the coin that caused the jam was from. You guessed it. Malta!
Tags: Best wordpress plugins for small business website, most important wordpress plugins for beginners, hosting service more info
9 notes
·
View notes
Text
HOSTDIME HOSTING REVIEW

HOSTDIME HOSTING REVIEW
HostDime was founded by Vivar Manny in Florida, United States in 2001. With the increase in number of its servers, the company deemed to take necessary steps to establish a full-fledged data center. In December 2003, HostDime became a proud owner of a high-tech data center. HostDime mainly focus on delivering managed cloud web hosting and tools to help their individuals and business to make their online availability without any hassles. HostDime is attractive for its affordable pricing, high uptime, and 24/7 customer service.
General Information
1. Speed - 920 ms (November 2019 to November 2020 average)
2. UpTime - 99.99% (November 2019 to November 2020 average)
3. Support - live chat, email, phone line
4. Apps - Joomla, WordPress, Drupal, PHP, Zen Cart, and other popular apps.
5. Features - Softaculous website builder, DDoS protection, SSL certificates, Remote site backups, CDN and Cloud Accelerator, Bandwidth limits, Activity monitoring and web stats, WordPress support, One- click app installs, 24/7 tech support, Money-back guarantee.

6. Plans - Dedicated server hosting/ Cloud services Colocation
7. Site Transfer - Free site transfers within the first month of signing up
8. Price - The cheapest hosting plan from HostDime costs $35.51 per month
Pros and Cons of HostDime Hosting
1.Reliable uptime - HostDime promises good performance and an uptime of 99.99% per month. They value their promise by giving a refund if their scales fall into a range,
# 95% to 99.98% - refund of 10% of your monthly payment
# 90% to 94.9% - refund of 25% of your monthly payment
# 89.99% and below- full refund of your monthly payment
The company has put several measures to ensure that your site remains up and running throughout. Their real-time monitoring system helps them to get live updates about how their server is fairing. This system is popularly known as Synapse. HostDime gives tech support to rectify issues even before we notice them.
2.Impressive loading times
HostDime features fast page loading times. On average, most hosted sites display results within 920 ms. HostDime being one of the largest data centre in the south-east US has excellent network credentials. Additionally, the web host partners with highly reputed Tier-1 carriers including NTT Communications and Cogent to deliver stellar connection speeds and bandwidth.
3.Helpful customer support
HostDime data centers are fully equipped with complete around-the-clock tech support and can be contacted by means of live chat, telephone, or email with just few details to link with customer support representative.
HostDime website and blog section are two areas from which useful information and answers are available for all type of queries of the customers.
HostDime also has a few self-help options. FAQS, manuals, guides, and video tutorials. There is a customer community, where HostDime staff and fellow customers can be interacted.
4.Top-class security
HostDime hosting offers top class security features at an additional cost. HostDime provides DDoS protection to all users. This comes in three different types,
- traffic scrubbing
- NETSCOUT’s mitigation - NETSCOUT’s filtering helps to guard sites against unusual high or irregular traffic.
- Cloud Protection - Cloud protection is a hybrid system that provides real-time site monitoring of all sites.
- SSL certificate from HostDime is an advantage that authenticates website and assures visitors as safe website.
5. Easy-to-use dashboard
HostDime features a very easy cPanel that allows users to painlessly manage all the aspects of their hosting. The cPanel dashboard displays useful information like bandwidth graphs, billing information, affiliate program, server performance, and licenses management.
6. Cons
HostDime policy on strict money-back guarantee is not attractive. Some users notice a fall of uptime.
Hosting Plans
1.Managed VPS – 1: Cost at $65/ month, Storage space 60 GB, Bandwidth limit 5 TB.
2. Managed VPS – 2: Cost at $80/month, Storage space 100 GB, Bandwidth limit 5TB
3. Windows WVPS- 1: Cost at $85/ month, Storage space 60 GB, Bandwidth limit 5 TB.
Other Hosting Plans
1. Quad-core dedicated servers
2. Managed VPS
3. Colocation packages
Recommended
Though not a smart option for beginners or small businesses most of the plans are made for customers with complex IT needs and big budgets. Generally, HostDime is a professional web hosting provider.
0 notes
Text
Blogging tips and tutorials


This report includes the resources we use and recommend based on our experience in the online world. If you have doubts in applying these please reach out. We are glad to help and grateful to connect.
Jose Louro BLUEHOST BlueHost is one of the best web hosting sites out there !
Take a look at BlueHost’s many benefits:
A guaranteed 99.9 uptime– Quick recovery from site crashes, meaning you get unmatched access speed and almost constant uptime. Presence of cPanel, for ease in navigation– Customers get to navigate and manage a number of features without going through complicated processes. Multiple hosting options such as shared and VPS hosting– Greater versatility means customers get to choose how to host based on business needs. Absolutely unlimited Domain hosting, with unlimited file transfer and space– Customers will never want in terms of capacity with more than enough space to go around. Unlimited emails– Receive all the emails you can and send as many. Indefinitely. Competent pricing for beginners– A great deal for those new to the industry, especially for new startups looking to get more value for less expenditure. A lot of powerful add-ons for extra value– This is a boost for an already powerful hosting service enabling for better features and efficiency. Unbeatable moneyback guarantee– BlueHost doesn’t force you to pay if you don’t like it. You get what you paid for or you get back what you paid. The first thing to do to start off on this is to create an account on Bluehost. Follow the detailed steps below for this purpose.
1. First, go to the Bluehost website and click on the “get started now” button in green.

2. Once you have clicked on “get started now”, you will be redirected to a page with four plans to choose from. These are Basic, Plus, Prime and Go PRO.
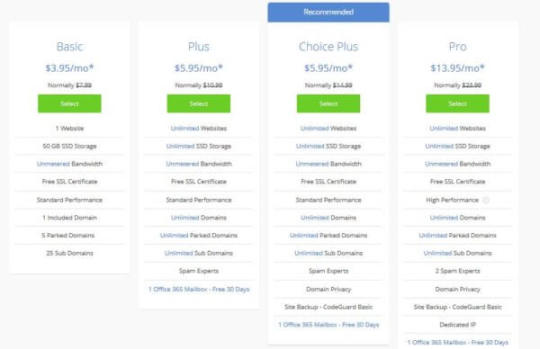
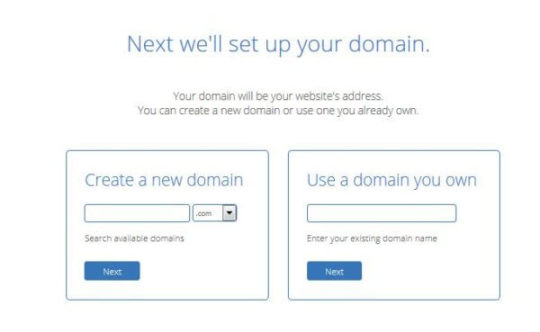
*The recommendation is that you start off with the basic plan for its cheapness and simplicity. 3. The next step after you have selected your preferred plan is to craft a domain name. You will be asked to do so. If you have an existing domain, you may enter it in the right box, and if you want to create one, enter the new domain name in the left box.
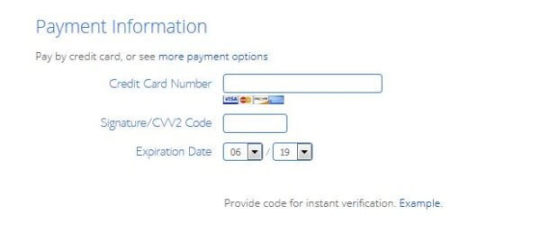
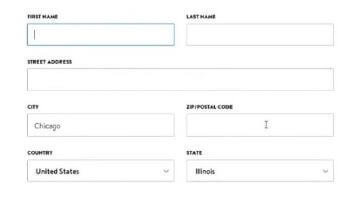
4. After the domain name is entered, you will be taken to a page where you will have to enter your personal information. This is integral to your credibility so ensure that you put in the right details.

You will also be prompted to enter your payment details. Carefully do so. PayPal is also an option.
5. You also have add-ons that you can choose from to make your experience smooth and secure.

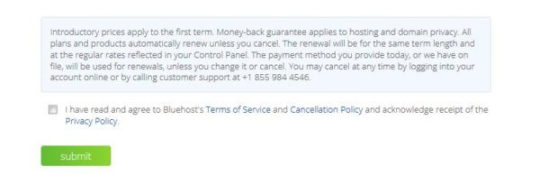
Small notes about the Add-Ons: Domain privacy - You get to hide your personal information and contacts, such as your name. Site Backup pro - In case of a website crash or some glitch, you get to restore your information by clicking one button. This means that all information is automatically backed up. Search Engine Jumpstart - From quick indexing to head-to-head comparative analysis reports, you are covered under this. You are also guided through the steps to improve your SEO rankings yourself and learn the tricks of Search Engine Mastery. SiteLock Security - This assures a security boost for your domain, involving scans for malware to DDoS protection. 6. Just read the disclaimer carefully and then click on the green button “Submit”, once you are done.
7. Now that you are done with the sign-up process, log in to your Bluehost account and you will see a control panel, where you need to click on the WordPress button.
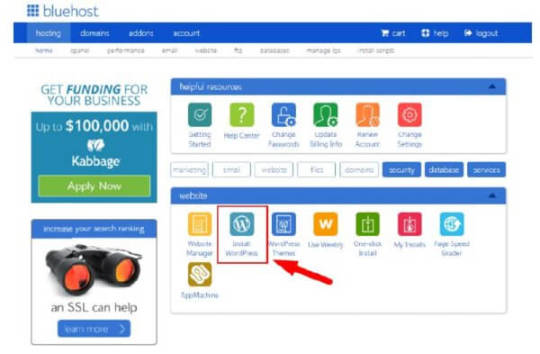
You may be redirected to the Mojo marketplace where you need to click on “Install New Scripts”.

On the next page, please enter your domain name that you have decided upon. This is where your WordPress will be installed on.
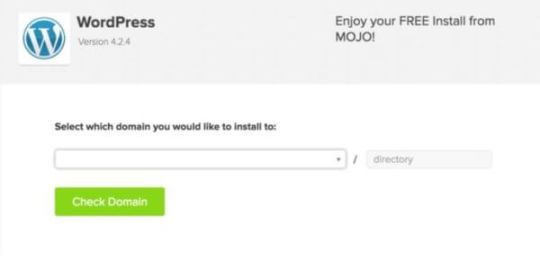
Notice that there is a small box stating “directory” on the right after a forward slash. You may leave it blank, in which case, WordPress will be installed on the root domain. If you write something there, for example “xyz”, the directory will appear as domain.com/xyz, and WordPress will be installed here. After this, click on the button “check domain”. Click “continue” on any following window until the installation starts. 8. WordPress installation will be followed by a page asking for your login credentials for WordPress.
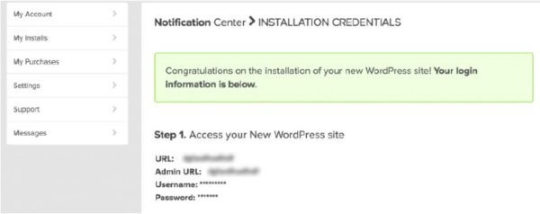
This will be followed by a confirmation email at your registered email address. So, if you have a wish to have a website of your own, get on this immediately! Get a Bluehost account now! That’s all really! Also, check out more here!
After having your Domain and Hosting you need to install a Theme that is User-friendly and lets you customize in an easy way if you’re not very tech-savvy.
Elegant Themes Elegant Themes is considered as one of the biggest revolutionary aspect of WordPress development. Being the most empowered WordPress community on the web, it helps users to create amazing website designs using premium WordPress themes and plugins. With these, you can take your website to a new level of professionalism.
These are the benefits of utilizing Elegant Themes:
Incredibly customizable – You get to customize your website theme and colour down to the smallest details. No need to dive deep into the coding process – You don’t have to be a coding savant to be able to use Elegant Themes to its fullest. Takes very less time to just drag and drop to develop a website – Optimization to the greatest level to bring about an ease in website designs and aesthetics. Offers design consistency – Every design is streamlined to ensure that bugs are minimized, making for a beautiful experience for those who visit your site. Compatible with several e-commerce plugins – You get to add a number of eCommerce plugins to your theme, meaning that you get to expand your business scope. Promotes your websites with premium WordPress plugins – This means that you don’t need to jump around the site for different functions but get most options at your fingertips thanks to these.
Follow the detailed steps mentioned in the next page to make the most of the premium themes and plugins provided by Elegant Themes.
1. First, go to the Elegant Themes website and click on the “Pricing” button.

2. Once you have clicked on it, you will be redirected to a page that includes the sign-up process. They have two membership plans which include Yearly Access ($89/year) and Lifetime Access ($249 one time) as you can see on the screenshot below:
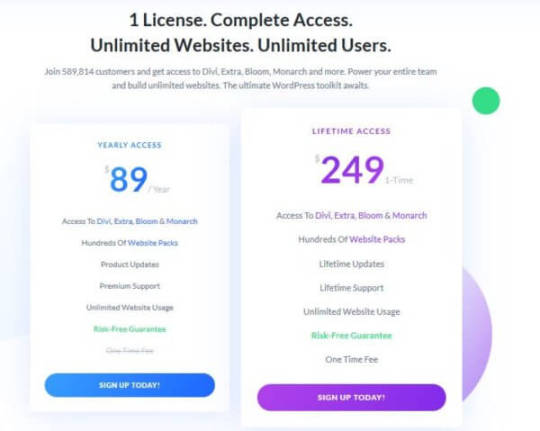
Select your choice and click on the “Sign up Today” button. It will take you to another page, where you need to submit your personal details such as username, password, email ID.

3. Once you’ve filled out all the mandatory slots, click on “Complete Registration”. Now, you’ll be asked to provide your payment account details for the completion of online payment. 4. After completing the sign-up process, you can visit the members area anytime by just logging in from the main page. There, you will find several themes and plugins which you can download and try out like ‘Divi’.

To get these themes and plugins, you need to click on the download button. 5. Next, save the downloaded file according to your preferences and keep it for utilizing through your WordPress website. 6. Now, head onto your WordPress website, go to “Appearance” - there you will find a drop-down menu containing “Themes” option. From there, upload the previously downloaded theme from Elegant Themes.
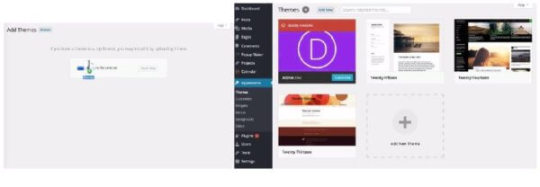
Now the installation process can be initiated. Once it is complete, you will get to see that the theme is active. The same procedure should be followed in case of installing plugin packages to your website. Download the plugin from the membership area. Next, go to WordPress dashboard, click on the Plugins option. This will let you add the downloaded plugin. Thereon, all you need to do is just activate the plugin by clicking on the relevant option.

Go through the readme file for that particular plugin, and get a thorough idea on its implementations. Elegant Themes’ packages are quite useful for web designers, business owners who think to use their WordPress framework for developing a website at its best. So, if you wish to use the themes and plugins from Elegant Themes and build attractive websites for your clients, sign up with an account right now!

Thrive Themes Today, when building a professional website or blog has become a crucial part of digital marketing, Thrive Themes is one of the strongest WordPress theme that one must install to attract audience and enhance the site’s conversion rate. Many people would regard this one to be just a theme, but in actuality, it offers different types of plugins that provide the audience much better experience. Different Thrive Themes Plugins are designed for distinct purposes and can be purchased separately. But a Thrive Themes package is always better to purchase as it offers everything from themes to plugins along with all the training and support that goes along with the package and that’s for a much-discounted price.
Following are the advantages of Thrive Themes:
The designs are simple in terms of layout and the fonts are clear, thus easily readable. Using specific action forms or calls to action, one can easily set focus areas in the website. The themes come with pre-built landing pages that can make website look stunning in minutes. Its lead generating plugin can be used to design and place email option forms to expand business email list. Using Thrives plugin like Thrive Clever Widgets, reaching out the audience with targeted content, makes much easier. Thrive Themes enhances conversions, promotional options and sales. With in-built social media sharing, reaching the target audience has become easier. In-built image optimizer builds images that compliments the website’s theme. Displays related posts at the end of the blog posts without slowing down the website. Very quick maintenance and excellent support.
To enjoy these features, one must start with creating a membership account with Thrive Themes.
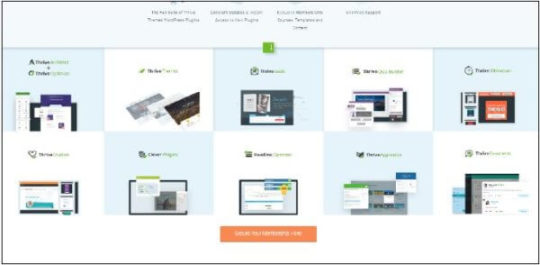
1. First go the Thrive Themes website and their click on the “Get All Our Products” button.

2. Once you have clicked on that button, you will land into a page that talks about the membership plans. Now scroll down and click on “Secure Your Membership Here!” button.
3. Now, you will be redirected to membership pricing page, where first of all you have to select either “Paid Quarterly” or “Paid Annually” options. After selecting the same, you have to choose your Membership plan according to your requirement and business type. If you are an individual or an entrepreneur, pick “Thrive Membership” option and if you are running an agency or is a web designer, click on “Agency Membership” plan. Click on the “Add To Cart” button to buy the service.

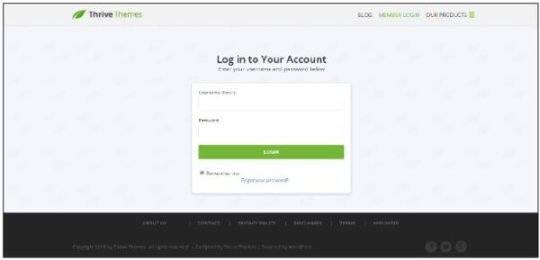
4. Now, a checkout page will appear, where you must put all the required information. After filling up the details, proceed with your desired payment option to download and enjoy the facilities of the plugins. 5. Once you have purchased the membership plan, you can now go to member’s login page by clicking on “Member Login” button on the top of the webpage. Here, you have to enter your Username and Password to log into the Thrive Dashboard.
6. Now, when you are into the Thrive member’s dashboard, you can scroll down to get access to different Thrive products. Pick the one that suits your need and click on the ‘Download’ button. Here to guide you, I am picking up the Thrive Leads plugin. As soon as you click on the button, you will be asked to save the .zip file. As you save it, the download process will start spontaneously.

7. Next, to begin the installation process, go to your WordPress Admin Dashboard and long into it. 8. In the left side menu bar, look for “Plugins” option. When you take your cursor on top of the button, you will find “Add New” option. Click on the same.

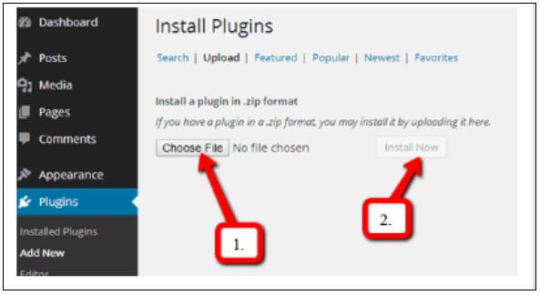
9. On clicking on “Add New” option, a page will appear with a “Upload Plugin” button on the top of it. Click on it.
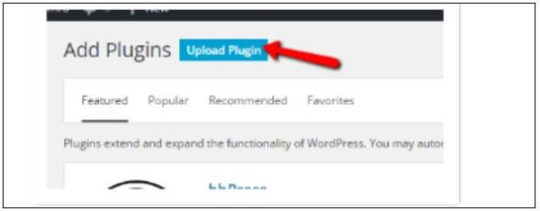
Now, you can upload the plugin by clicking on the “Choose File” option. choose the .zip file that you earlier saved and then click on the “Install Now” button to successfully upload the file.
10.After a successful installation, a page will appear before you with an option “Activate Plugin”. click on it.

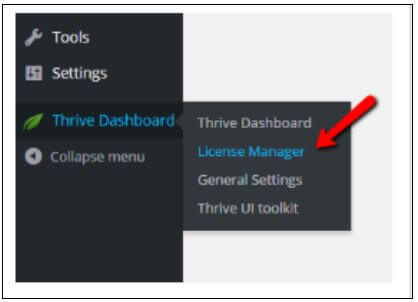
11.Now, it’s the time to activate the license of this plugin. In the menu bar of WordPress, go to the Thrive Dashboard and choose the License Manager.
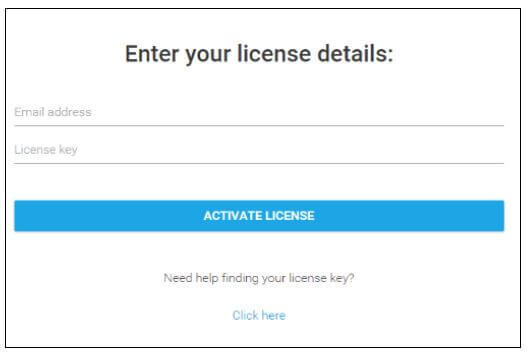
12.Go back to your Thrive Themes account to find the license key. Provide both the email address and the key on License Manager page and click on the “Activate License” button to enjoy the features of the chosen plugin.
Thrive Themes is the ideal theme to enhance the look and functionality of a website. The newbie bloggers or entrepreneurs can use this theme to gain leads and engage the audience to their website. Different plugins with pretty powerful features not only maximize conversion rate and customize the website but also allow you to target ultra-segmented audiences and experience dramatic business growth. So, apply for its membership today to build your business website smoothly. Next You need a reliable Email marketing Service.

CONVERTKIT ConvertKit is one of the finest tools to assist bloggers get their craft off the ground! It is a one stop destination for any aspiring or established writer to work on and reap actual benefits. The best benefits you get of using ConvertKit are: Ease of tracking clicks and tagging users – Exceptionally well thought of tagging functions and click tracking abilities that tag according to the person’s interest. Efficient system for making email sequences – Compose and create from a single page rather than having to go to different pages for different functions. Automations & segmentation that are well designed – Automatic functions that ensure the tagging of new subscribers to your email list and much more! Integrates with a number of different platforms – Multi-platform support like with WordPress that allows you to use ConverKit in a number of different ways.
Let’s find out how to sign up and use it!
1. Signing Up - Go to ConvertKit and sign up. Enter your billing information & create your account.

Once you are done with entering your details, choose a plan. Make sure to be careful in choosing the most appropriate plan for you, don’t worry, you can always change it later, start with the lowest one.

2. Account approval – The next thing to get done is to have your ConvertKit account verified and approved! The purpose is obviously to test your credibility as a blogger. Normal business requirements allow you to submit your piece via an URL on their chat feature. The other way to gain acceptance is through the submission of a ticket feature and then provide the URL to your blog. Although you may browse around ConvertKit in the interim period, it is only post-approval that you can send something on it. 3. Time to Import Any Existing Subscriber – Do you have an email list? No? Then let’s go to the next step. But if yes, here’s what you do! Adding tags is the primary thing to do in the “Add Subscribers” process before anything else. This will categorize your subscribers accurately and for this, click on “Subscribers” on the menu and then hit “Create a Tag”.
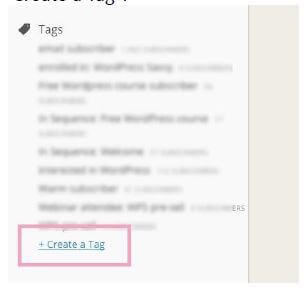
This is a really simple and effective process. For one, you may use a mundane and self-explanatory title to a tag like “imported subscribers”.
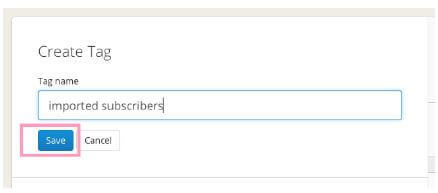
Make your checks and name your tags and when you are sure that you are done, hit “Save”. The next step is to import subscribers from the current email provider you have, saving that as a CSV file. Then, hit “Subscribers” on the main menu and then “Import Subscribers”.

Next, upload the saved CSV file and put your subscribers under the designated tags, in this case, “Imported Subscribers”. Align the columns on the CSV sheet to the relevant ConvertKit fields and then, finally, hit “Import Subscribers”. Repeat this for other lists, if available. 4. Form creation – This is the first look of your dashboard.
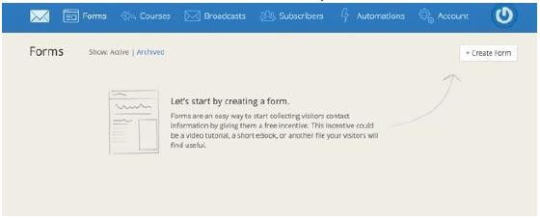
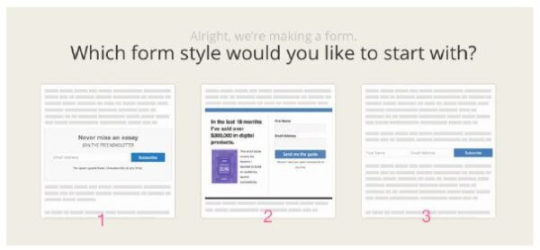
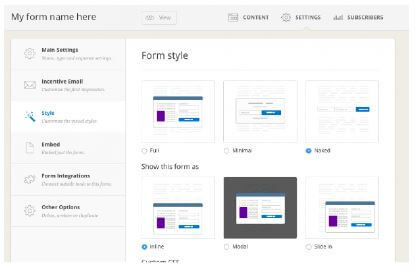
Once you click on “Create Form”, you can choose a form or a landing page. Let us go with form for now. You may choose one of three styles that serve different purposes.
You can also go ahead and customize your form by clicking on the icon at the top right edge as per the picture below. Colour as you wish, and you may even personalize as per your brand.
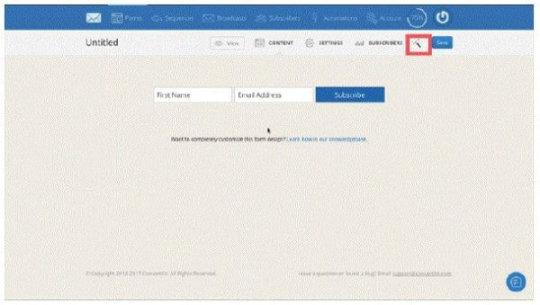
Access settings and change your form name, which is only visible to you, available on Dashboard once you sign-in. Modify the success message to what you want your subscribers to see when they fill up the form and hit “Subscribe”. You may, if you wish, redirect subscribers to a different page that displays a thank you message for subscribing or something else. After this, click on the “Save Form” button. 5. Incentive Emails – This is the very email that subscribers will receive that will be a confirmation of their subscription. You can turn it off if you so wish by clicking on the checkbox adjacent to the “send incentive/double opt-in emails” to your subscriber checkbox. Configure email and the subject title along with the email and button text! Go ahead and select the form style!
6. Form Addition – Now, on to embedding the subscription form on your website. There are three methods present, namely, WordPress, Javascript or Raw HTML.
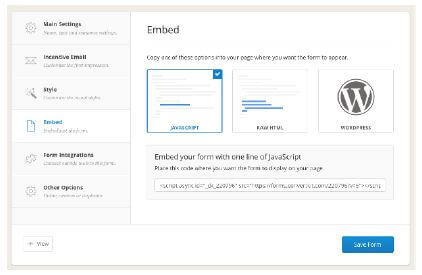
So, don’t wait and lay the groundwork for your future with ConvertKit’s excellent facilities!

GetResponse is a complete online marketing solution. It provides turnkey newsletter publishing and hosting features, as well as unlimited follow-up autoresponders, landing pages, webinars, marketing automation, and CRM to deliver information to your contacts and convert them to paying customers. Through responsible and fully automated list hygiene, anti-spam practices, and established relationships with major Internet service providers and email service providers, GetResponse prides itself on the highest possible email deliverability to ensure that your messages get through to your prospective customers. The platform delivers over 5 billion emails each year in 172 countries. GetResponse is fully scalable and capable of handling both small and very large lists (1+ million subscribers).
GetResponse in highlights:
Over 100,000 active accounts 30-day free trial Deliverability of up to 68% higher than our competitors Unlimited emails Powerful, automatic message personalization Smart tracking features
What benefits does it bring?
Catches lost sales and jolts your leads into profitable action Boosts your lead generation and business-building results Chops away tedious and repetitious email marketing tasks When you sign up for an account with GetResponse, you will be supported every step of the way by their excellent customer support and materials (context help, user guides, FAQs, and video tutorials). You will benefit from industry-leading email deliverability which GetResponse consistently maintains through their solid relationships with ISPs, proactive delivery initiatives, and strong anti-spam commitment. Try GetResponse today and find out how you can instantly get tangible, measurable results without wasting your time or investing a lot of money. The GetResponse List Building Program is a comprehensive email marketing course that covers everything you need to know to grow your list by up to 10,000 subscribers in as little as 90 days. Now marketers can maximize their email marketing efforts by taking advantage of this free program and enhancing their lists with new, engaged subscribers. The list building program, used with GetResponse email marketing tools, is the complete marketing solution. Marketers are provided with the know-how and necessary tools to launch a comprehensive and effective email marketing campaign. The course is unique to GetResponse and created exclusively for GetResponse customers; both free trial and pro accounts that have less than 10,000 subscribers. Customers may choose from two program schedules: the 90-day fast track and the 180-day standard program. Each session consists of a video tutorial, presentation, and an article. Those who complete the program and acquire at least 1,000 new subscribers will receive a GetResponse University Certificate of Performance. More details about the course may be found here: Getresponse Course So, then we have Social Media, if you are active and I think you are and should be consider using SMARTERQUEUE

SmarterQueue is a great post scheduling platform and a better alternative to the likes of Hootsuite and others. Why? Simply because it is all round more flexible with a focused view on customer friendly usability. These are what makes SmarterQueue truly effective: User-friendly interface- SmarterQueue has a great user-friendly interface which is very easy to use. The navigation is straightforward, and you can even filter your queue by category and social media platform. Competent pricing- In terms of pricing, no one can beat SmarterQueue. $20 a month will connect you up to four social media platforms that include Facebook, Twitter, LinkedIn, and Instagram. RSS Feeds to help in content curation- If you are currently using Feedly to curate your content, you will love how easy it is to integrate Feedly with SmarterQueue. SmarterQueue will import all your feeds so that you can curate content from one place without having to log in to Feedly. Posting simplicity- SmarterQueue makes posting content effortless and easy. Simply set a posting schedule for each of your accounts and then create categories for each type of content that you want to share. From there, just add posts to your categories and SmarterQueue will do the rest. Social media analytics- Social Media Analytics in SmarterQueue can help you decide when is the right time to post on Facebook or tweet, so that it gets the maximum visibility. Let’s learn the steps to properly get on with the SmarterQueue platform! Step 1: Visit SmarterQueue and go ahead to the sign-up page!

Choose how you want to sign-up and then log-in in the future. You will be prompted to start a trial or leave that for later. Once you are past that, it is time to set up the account for your work. This is how it looks:
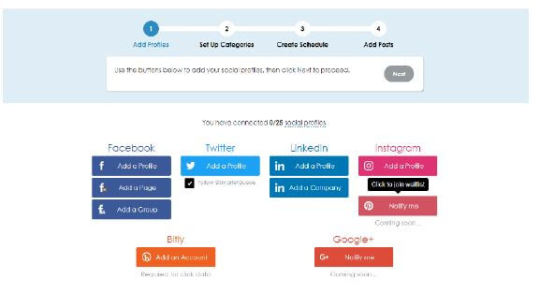
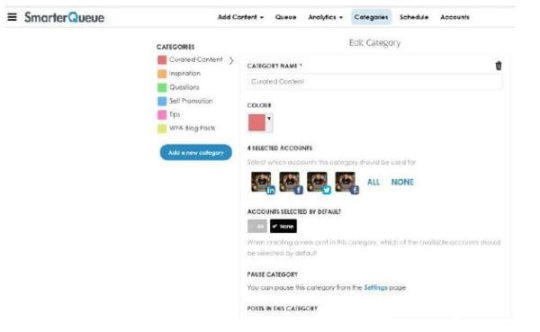
Add the profiles accordingly to expand your network on the platform. These are where you will be able to post via SmarterQueue, once you are up and running. Step 2: This is where you categorize by creating post categories. What are these? They are the different varieties of content that you will be putting up on social media. Name these as you like and make them relevant for ease of scheduling in the future.
Step 3: It is now time to create a schedule based on the categories that you have defined. The schedule is also for which accounts you want to post and in what order.

Step 4: Next up, add content to the posts! Your first option should be evergreen posts. What are these? Well, these are posts with a continuous recycle patter, that is, they are always renewing themselves. On SmarterQueue, the moment you add a new post, it immediately goes for the next available time and after being shared, it is sent to the bottom of the queue automatically. Basically, you fill up your queue once, and the platform automatically takes care of the scheduling from then onwards. Step 5: Like what you have seen so far? If you have had a great experience for the trial period, don’t forget to go for the paid subscriptions for continued services and greater benefits.
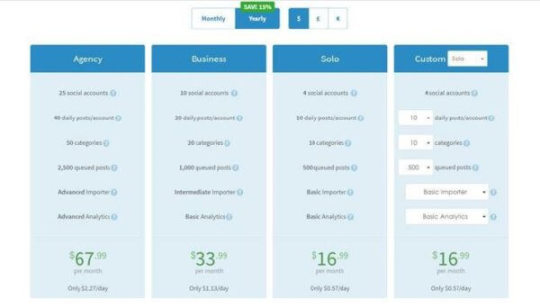
Every plan has the same basic features, except that the real difference is with the number of categories, volume of social media accounts, queued and daily posts. This is obviously one of the finer options out there and it’s time you get your membership of SmarterQueue! An alternative for Social Media is Social Pilot

Social Pilot SocialPilot is one of the most popular social media marketing and scheduling platform which was specifically developed for social media professionals and agencies. Here are some unique features that sets it apart from others; custom Facebook branding, bulk scheduling, team collaboration, social media calendar and client management.
The Benefits of SocialPilot are as follows:
Customized Facebook Branding- Using SocialPilot for sharing on Facebook, you can put your own customized branding so that it does not look automated. Bulk Scheduling- Using this feature you can create bulk posts as much as 500 or more at once, by simply uploading the CSV files. This awesome attribute allows users to manage multiple social media platforms with great ease and flexibility. Collaboration within teams- Using this platform, users can easily invite their team member to work in collaboration, share files, communicate, and come up with some useful business ideas. You can include as many participants as you want. Social Media Calendar- Users can visualize their social media sharing strategies and make them more creative and fruitful using SocialPilot. Effective extension on the browser- SocialPilot offers browser extension for Chrome, Firefox and Safari which not only lets the user share an interesting article from the internet, but also enables them schedule images from Canva. Social Media Analytics- The platform provides powerful, yet easy to understand social media analytics that lets a user improvise social media marketing with efficiency. Step 1: Visit the SocialPilot website and click on the “Get Started” button in orange.

Steps 2: Once you click on the Get Started button you will be redirected to the “Plans” page, which offers 4 distinct plans, namely Individual, Professional, Small team and Agency.
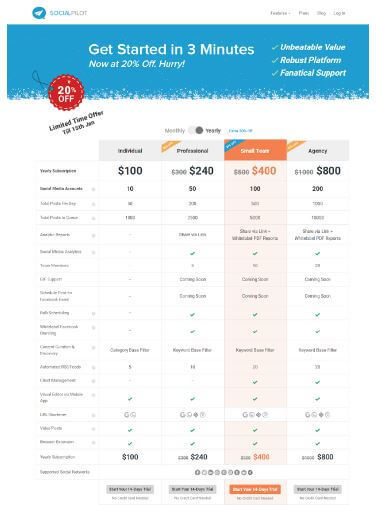
*we recommend you start with the “Individual plan” to see how it pans out. Step 3: In the next step, after you have chosen your preferred plan, click on start your 14-day trial and you will be redirected to the following page. You won’t require your credit card for this process.

Step 4: Fill up the credential details and click on “Signup”. You will be further redirected to a page where you will need to connect with any of your available social media account. You can also save time by skipping this step and connecting with any of the 3 specific social media platforms mentioned here, namely Facebook, Twitter and LinkedIn and complete the registration procedure.

Step 5: When you have completed registration, you will receive an email asking to confirm the email address you used for signing up. As soon as you confirm that email address you will be redirected to a dashboard. Step 6: As you reach the “dashboard” page or log into your SocialPilot account, the first thing you need to do is to connect your social profiles. To do this, click on “Connect Account” on the left panel under Social Accounts.

After you’ve completed connecting a profile, you will now be able to set a schedule for your posts. Please note that the default time zone is set for the United States, so adjust it accordingly to your needs. You can click on the “Edit” button to select your desired time zone on the next page.

To revisit setting a schedule, click on Manage Accounts on the left pane. Then, click on “Edit” for that account. Now you’re equipped to add a schedule for your social profile.

You can specify the time to add to the posting schedule under “Select Time” option. You can also choose the specific days of the week on which the schedule should be running. Once completed, click on the button displaying “Add Time”. Then, click on “Create Post” on the left pane to start adding posts into your schedule. Now you can start composing your post and adding links.
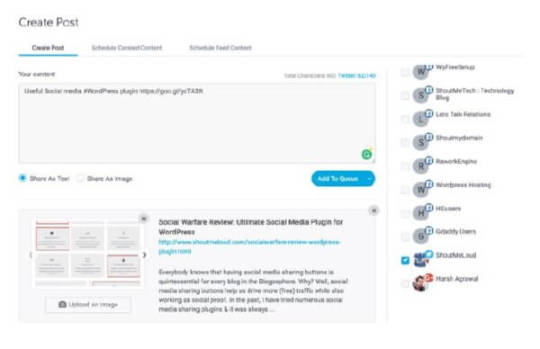
Once you have created the post, you will find three options in the drop-down menu: Add to Queue, Share Now and Share Next. Add to Queue will add that post to the schedule queue, while Share Now will share the content right then and there.

If you are out of content ideas, you can always use “SocialPilot content discovery” to get your hands on more interesting stories to share on your network. Social Media is the future, it is the place where most interactions take place, and where your content will most likely get noticed. However, you don’t need to be on every platform, just the ones providing the best exposure, and SocialPilot is one of the best tools to do so. But then we have something Special: Sniply

Sniply From link sharing to custom call to action to audience engagement monitoring, Sniply has come a long way in becoming integral to the online marketing process.
The benefits of Sniply are as follows:
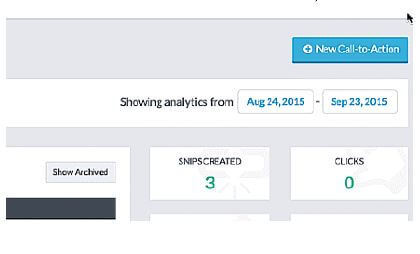
Simple Setup and Installation- Sniply is one of those innovations with super-easy interface that involves a simple setup and installation. Great Call-to-Action- You can create a call-to-action for every link you share. The call-to-actions are not only time-sensitive that instill a sense of urgency but are also, interesting, and intriguing that are ultimately valuable to your customers. Compact Links Creation- The link shortener from Sniply is so compact that it lets you put a customized call-to-action on every page you share. When people click on a Sniply-generated URL, the page displays the ‘snip’ with a floating mini-banner which contains your CTA message along with a button that clicks through to the URL of your choice. Social Media Analytics- The platform’s dashboard shows you clicks, conversions, and conversion rates. You can also see your top-performing snips, top websites, and favorites as well. Customizable Free Edition- The free edition of Sniply is greatly customizable, leave alone the paid one. It allows you to change color, style and position of your snips, making them stand out without being irritating.
The real question for beginners to the scene is how to use it to its full potential. That’s what we are about to find out!
Step 1: Go to Sniply. There is an option to sign up for free as you can see below.

The next page will ask you to sign up via Twitter or Facebook or the age-old way of putting your details in. Step 2: Choose any of the plans that suit you. Everyone of them is free for 14 days. The recommendation is that you choose the basic for now as it’s the simplest.

Step 3: Find a content to share on social media platforms and ensure that it is an article/journal/blog that is connected to your occupation or business. Then, copy the URL of this piece to Sniply as shown below.

After you have entered the URL, hit the ‘snip’ button which will customize the URL as per your wish. Click ‘create’ next and then copy the custom URL to be shared on the social media platform of your choice.
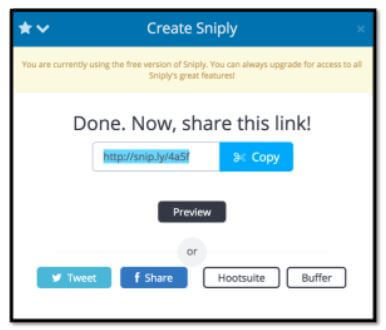
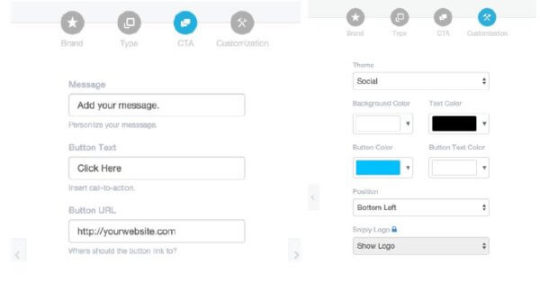
* Remember that when you are using Twitter to share, don’t forget to add the handle or name of the writer of the original post. It gives credit where it’s due and ensures that more people see your post. Step 4: Now it is time to set up a call to action through Sniply. On the dashboard, click on ‘Manage’ and then ‘call to action’.

Hit “+ New Call-to-Action” and then select a brand that exists or create one.
Now choose a type for your call-to-action.

Put in the preferred link for the call-to-action and then customize as you wish to be a worthy match for your company/brand.
So start with Sniply today and behold the changes to your social media functions! If you plan or already have Products like E-books or other Digital (or Physical) Products you can set up a successful online shop with Shopify and leverage Sales. So lets see how it works:Shopify

Shopify Shopify’s exceptional capabilities in easily setting up your online shop has cemented its position as one of the most reliable ecommerce platforms out there!
The benefits that you get are:
Round the clock customer support- Shopify is big on customer support. It’s customer support is available 24 hours a day, 7 days a week. The response time is fairly instant, which means your business is never on its own. Mobile optimized- All of Shopify’s themes are mobile responsive. The platform also includes a free built-in mobile commerce shopping cart, which means your store looks great on all devices. Availability of SEO tools- Shopify has powerful Search Engine Optimization (SEO) features that will help your website rank higher in search results, so customers can find you easily. Stripe-powered payment gateway- Shopify has integrated with dozens of payment gateways, but also offers its own which is powered by Stripe. If you choose to use the Stripe-powered payment gateway, you will not incur any transaction fees instead, you will benefit from lower credit card fees. User-friendly interface- Shopify has a user-friendly customer front-end and admin backend which provides enhanced navigation options and various tools to help you manage inventory, insert product details, create web pages, track customer details, set up customer accounts, receive payments in various currencies, and much more. App store for addons- Shopify has an app store which provides some free and some paid plugins that seamlessly integrate with the platform and helps you to expand the functionality of your online store. Indeed, with it, your dreams of running an online business has become within your reach and if you learn every option that the platform provides, there is nothing that can prevent you from having your own online shop.
Let’s Start!
1. Sign up to Shopify and then navigate to the Shopify website. Click on the Get Started button.

You need to enter your information, such as the store name, desired password and an email address and finally stating what kind of an online or physical shop you are looking to create.

This is where you put in the information. Ensure that these are all valid and accurate.
2. Customize the appearance of your store and it’s rather easy. Check out the image below. You need to click on the “Add Product” button and then enter all the details pertaining to the product such as price, vendor and description. When you are done, save it.

3. Return to your dashboard and hit the button saying, “Customize the Look of Your Site.” This is an extremely versatile place for changing colours and logos alike!

4. This step involves the selection of a domain and getting your site LIVE.

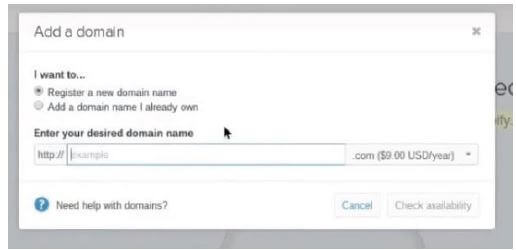
At the Dashboard, click on “Add a Domain.” Choose one to your liking and proceed to the next step in the process.
5. On the Dashboard, check out the “Payments” button at the left. You may now choose from numerous options such as Stripe, PayPal, etc. and if in doubt, you may also choose Shopify’s personal payment processor that is quite user-friendly. Once you choose one that suits your purpose/requirements, you will be able to receive payments from customers and store them. Once you are satisfied, hit the “Launch Website” button!

So you can use Shopify and have your own successful online venture today! Disclaimer: This is an important note that there are some links above which are affiliate links and if you click on them and decide to purchase something, I shall earn a commission at no additional cost to you. Let me say on record that I have used and experienced the services of this company, and my recommendation is strong as I have found them to be very helpful and useful. My opinion is not based on the commission I make, but because of how reliable I found this to be. You are not compelled to make any decision unless you see fit and feel that they will help you achieve your goal. Check out our shop with all these resources:

Read the full article
#blogging#bloggingsuccess#buildhomebusiness#business#BusinessSkills#Creativity#Determination#digitalmarketing#digitalnomad#DisciplineinLife#EffectiveTools#entrepreneur#Entrepreneurs#Entrepreneurship#internetbusiness#lifegoals#LifeStyleAttitude#locationindependent#luovita#makemoneyonline#mompreneurs#onlinebusiness#OnlineEntrepreneurs#onlinemarketing#OnlinePlatforms#OnlineTools#personalandprofessionalworld#ProcessFlow#travelfreedom#workfromhome
0 notes
Link
Line25 http://j.mp/2QuFcPB
How to Create a WordPress Site: The Ultimate Beginner’s Guide 2019

I think you’ll agree with me when I say: creating a WordPress site is a challenging feat for a beginner. Where to start; what to do? Should you choose WordPress.com or WordPress.org, and what’s the difference between the two?
How much does creating a WordPress site cost? Is it $50 bucks, $100 bucks or $10,000 bucks? You have no idea. But still, you yearn to create a WordPress site and that’s good.
Take a breather. Turns out creating a WordPress website is easy, and in this post I will show you exactly how. At the end of the day, you’ll end up creating site after site like the pros.
Read on to learn more.
Start With a Plan
Setting up a WordPress website is like building a house. You must start with a plan. What kind of website are you creating? Why are you creating the website to begin with? I mean, what would you like to achieve with the said website? Answers to these questions (among others) will inform your plan.
For instance, if you’re building an ecommerce website, you consider plugins such as WooCommerce, Ninja Shop and WP Shopify among others. You’ll also need a WordPress ecommerce theme. Additionally, you need a powerful hosting solution.
If you’re creating a portfolio site on the other hand, you need plugins that help you to showcase your work. You’ll also need a theme that fully supports portfolio features. A basic host is adequate for a simple portfolio.
See where I am going with this? Different websites will need different features and tools. Not to confuse you though (seeing as you’re a beginner), let’s get to work.
Disclaimer: For the purpose of illustration, we use Namecheap for this guide. You can, however, choose any other domain registrar and host. The process of creating a WordPress site remains technically the same regardless of the host or domain registrar you choose. If you need help choosing the perfect host for your WordPress site, we trust and recommend the hostingfacts.com website for the best hosting reviews.
What You’ll Need
A domain name such as line25.com
Great web hosting
30 minutes or less to configure it all, which includes installing WordPress
Buy a Domain Name
A good domain name is short, catchy and memorable. The domain name is your website address, or how readers recognize and find your site on the internet. Good examples of domain names include line25.com, google.com and facebook.com among others.
If you’re creating a personal blog or portfolio site for instance, you can use your name as your domain. You know, something like beyonce.com and charlimarie.com among others.
For ecommerce and business sites, you can use your business name as your domain name. For example, we use line25.com, and many other businesses do the same.
If you can’t come up with a nice domain name, feel free to use a tool such as Namemesh to get ideas based on your business name or keywords.

Many hosts nowadays offer you free domain registration for the first year. Once you sign up with the host, you start paying for the domain from the second year.
Alternatively, you can buy a domain name separately from a domain registrar such as Namecheap, and add it to your hosting account. But why buy a domain separately? Well, it offers you more control over your website address since you can add it to any hosting account.
Getting a domain name via a hosting company means you have lesser control over the domain name, since it’s owned and controlled by the same company.
Buying a domain name is easy and cheap, what with domains costing about $10 bucks per year. For instance, buying a domain name at Namecheap is a straight-forward process I wouldn’t you to run into any problems.
How to Buy a Domain Name at Namecheap
Without further ado, let us buy a domain name. Head over to Namecheap.com and enter your keyword in the search field as we highlight below.

Next, hit the Search button to get the ball rolling. Clicking the search button will lead you to the following screen, where you can see different variations of your domain name.

Choose one that rocks your world and hit the corresponding add to cart button. Once you hit the add to cart button, Namecheap (just like any other host) will try to cross-sell their other services to you. Ignore this, and click the View Cart button instead as shown below.

On the next screen, hit the Confirm Order button as we highlight in the image below.

Clicking the Confirm Order button will redirect you to either login to your Namecheap account or create a new one if you’re a new customer. As a new customer, fill out the form accurately and hit the Create Account and Continue button at the bottom of the form.

After that, add your account contact information on the next page we show in the image below.

Once you’ve filled out the form, hit the Continue button. This leads you to the Whois contact information screen. Set up your Whois contact info and hit the Continue button as shown below.

Next, choose your payment option on the billing screen and click the Continue button to complete your purchase.

Upon successful order completion, you’ll be redirected to an intuitive dashboard that looks like this:

My account has a total of three domain names, but yours will only show the domain you just bought. With a domain name in hand, it’s time to shop for a good host.
Choose Good Hosting
Your WordPress site needs a good home. Just like you’d do anything for the perfect home, your WordPress site needs the best hosting to thrive.
You cannot afford downtimes and server-related errors that make your beloved WordPress site unusable at any given time. If there’s a spike in traffic, your host should shoulder the burden without taking down your site.
Choosing a good host is all about your specific website needs. Different website features have different resource requirements. Your host of choice should cater to all of your website needs.
WordPress by itself has very low server requirements. Nearly every host on the planet can host WordPress. The problem arises when you start building your website on top of WordPress and the host doesn’t have sufficient resources for your website. Only go for the best.
There’s a special group of hosts known as managed WordPress hosting. They host WordPress sites exclusively. They are a bit pricier than, say, Namecheap, but many users feel the price is worth it. Popular companies in the area include WP Engine, Kinsta and Pagely among others.
A good host provides enough resources to sustain your site. On top of that, they offer great backup plans (although you should invest in off-site backups e.g. ManageWP.com), military-grade security and world-class 24/7 support.
From personal experience, Namecheap is a decent WordPress hosting company for beginners. Besides, you can always upgrade hosting depending on your website needs.
How to Buy Hosting From Namecheap
Point your browser to Namecheap.com, mouse over the Hosting menu and click the Shared Hosting sub-menu as shown below. Notice also, the other available hosting packages. For beginners though, I recommend shared hosting.

This will lead you to the pricing page for shared hosting packages. Choose Stellar, Stellar Plus or Stellar Business by clicking the respective Add to Cart button as shown below.

Shown above are the monthly prices for each package at the time of writing. As you can see, hosting a website is relatively cheap.
On the next screen, hit the Use a domain I own with Namecheap button as shown below.

This will prompt you to sign in to your Namecheap account. Click the Sign In button as we detail in the image below.

Enter your username and password to login, select the domain you’d like to use and hit the Continue button as shown below.

On the next screen, confirm your order by hitting the Confirm Order button as shown below.

Next, choose your payment method and hit the Continue button as we highlight below.

Go ahead and complete the purchase. After successfully purchasing hosting for your domain name, you will be redirected to your dashboard. You can explore all products (e.g. hosting, SSL certificates, etc) attached to your domain name as shown below.

As shown in the image above, you can see Value Hosting is now attached to the domain we bought. To manage your hosting and access your cPanel, click the Manage button as shown above. Click this button leads you to the screen below.

From the image above, notice your username and the Login to CPanel button. Note that you will also receive a welcome email from Namecheap with your login details and everything you need to hit the ground running.
Are you learning something?
Installing WordPress
Setting up WordPress is the stuff of fourth graders. It takes less than 5 minutes once you have you domain name and hosting set.
Login to your cPanel and click the Softaculous Apps Installer button as we highlight below.

After that, click the WordPress icon as we show in the screenshot below.
Next, hit the Install Now button to start as we detail below.

On the next screen, choose your domain name and other settings such as the site name, description and admin login details (make the details strong).

Fill out the form carefully and click the Install button at the bottom of the page. This will initiate the installation, which looks something like this:

After a couple of seconds (and if everything goes well), you should see the success screen shown below.

From the screen above, you can see where you installed WordPress as well as the link to login to the WordPress admin area. When you click the Administrative URL (e.g. http://j.mp/2VzAu6O), Softaculous will redirect you to your WordPress admin login page as shown below.

Login to your WordPress admin dashboard using the details you created while installing WordPress. Here is how the WordPress admin dashboard looks like.

And here is how your new WordPress site looks on the front-end, complete with the default Twenty Nineteen theme.

That’s it; you now have a new WordPress site that you can customize as you desire. There are thousands of WordPress themes and plugins at your disposal, meaning you can build the website of your dreams without ever hiring a developer.
Necessary Start Plugins
After creating your WordPress site, you need a couple of start plugins to super-charge your site. Off the top of my head, I’d recommend:
Akismet to fight comment spam
Jetpack for a nice suite of features such as comments and automatic social sharing among others
ManageWP to manage your site, and more importantly, create free off-site backups
iThemes security to keep the bad guys away
Yoast SEO so you can optimize your site for search engines like a pro
And any other plugin that helps you to meet your goal
Really, the plugins you end up choosing depends on your website needs
On Choosing a WordPress Theme
Choose a theme that complements your website. You can go for a theme specifically built for a single purpose e.g. eCommerce, restaurant, portfolio etc or a multi-purpose theme such as Total by WPExplorer.
Alternatively, you can start with a free theme and go premium when need be. Note, however, free themes don’t come with pro support and as many features.
Conclusion
Save for a few technical hurdles that may delay you, creating a WordPress site is both easy and cheap. Just pick a domain name, choose a good host and install WordPress.
The theme and plugins you use afterwards depend on your needs and preferences. At the end of the day, you’ll create WordPress sites like you have web design hard-wired into your brain.
Have questions or thoughts regarding this post? If so, please do not hesitate to comment below. Cheers and happy creating with WordPress!
http://j.mp/2Qu2sNt via Line25 URL : http://j.mp/2n58RCK
0 notes
Video
youtube
Assalam-0-Alaikum and Welcome to Tech Urdu! You've been working on your WordPress. You have done the SEO settings of your site. You have written some quality SEO friendly posts (as explained in the above videos). You need to apply for AdSense to start earning (and get the reward for your efforts). So, in this video, I'll be explaining you some amazing pieces of information about Google AdSense. I'll show you how to set up an AdSense Account, how to qualify for AdSense and how to connect your site with Google AdSense. Now, you can discuss your Problems and Questions (using Screenshots/Videos/Voce Messages, etc) here on Tech Urdu Facebook Page. First, LIKE Tech Urdu Facebook Page. Second, Comment under any video that you have sent your Questions on our Facebook Page. Then send your problems in Messages here: https://ift.tt/2OrUWoH ^^^Tech Urdu FREE Courses^^^ 1. Blogger Complete Course: https://www.youtube.com/playlist?list=PLs9p2Ata6d5pa5R2HTj4hvVJs6JnmnULz 2. WordPress Complete Training: https://www.youtube.com/watch?v=p2n59qqCr4g&list=PLs9p2Ata6d5raHnNaO69mkswfljWm-wW5&index=2&t=0s 3. Complete SEO Course for WordPress & Blogger: https://www.youtube.com/watch?v=E39e8NsMlCU&list=PLs9p2Ata6d5qKRf6wLZ4DhYJ7tJlhC47A =-=-=-=-=-=-=-=-==-=-=-=-=-=- Please Like, Share and if you want more such interesting and informative videos then SUBSCRIBE to Tech Urdu. Tech Urdu – SUBSCRIBE: https://www.youtube.com/user/tulaibjavid =-=-=-=-=-=-=-=-=-=-=-=-=-=-=-= \\\*** RELATED VIDEOS ***/// WordPress Complete Training | Part 1 - Introduction to the Course and Course Outline [Urdu/Hindi] https://youtu.be/p2n59qqCr4g WordPress Complete Training | Part 2 - Blogger.com Vs WordPress.com Vs WordPress.org [Urdu/Hindi] https://youtu.be/DpTlg5zrLBM WordPress Complete Training | Part 3 - How to Choose the Best Hosting for WordPress [Urdu/Hindi] https://youtu.be/Mkj7_YED1CA WordPress Complete Training | Part 4 - WordPress Installation Process from Cpanel [Urdu/Hindi] https://youtu.be/i03lJnb2bA8 WordPress Complete Training | Part 5 - Importing a Blogger Backup to WordPress Site [Urdu/Hindi] https://youtu.be/pdkjzgwKSHk WordPress Complete Training | Part 6 - Installing a WordPress Site on Local Host [Urdu/Hindi] https://youtu.be/FnrDID1V9_s WordPress Complete Training | Part 7 - WordPress Dashboard Overview [Urdu/Hindi] https://youtu.be/cSjEkpXhQYM WordPress Complete Training | Part 8 - Gutenberg WordPress Editor Complete Guide [Urdu/Hindi] https://youtu.be/4MLlG4KDRsw WordPress Complete Training | Part 9 - Writing Professional WordPress Posts [Urdu/Hindi] https://youtu.be/Un6hi3Y02Zg WordPress Complete Training | Part 10 - Privacy Policy Disclaimer Terms & Conditions [Urdu/Hindi] https://youtu.be/BUijRwezR4w WordPress Complete Training | Part 11 - Creating Menus, Sub-Menus, Mega-Menus [Urdu/Hindi] https://youtu.be/iCI97XV_Ll0 WordPress Complete Training | Part 12 - WordPress Themes - Selection and Customization [Urdu/Hindi] https://youtu.be/TdEnPucTlao WordPress Complete Training | Part 13 - Managing Widgets and Sidebars (Pro Tips) [Urdu/Hindi] https://youtu.be/keUEkDkEcck WordPress Complete Training | Part 14 - Essential WordPress Plugins (20+) [Urdu/Hindi] https://youtu.be/dMbKaQu6vNY WordPress Complete Training | Part 15 - SEO of a WordPress Site (Rank High in Google) [Urdu/Hindi] https://youtu.be/tGGaRoxXqms #wordpresscourse #wordpresstutorial #wordpressguide =-=-=-=-=-=-=-=-=-=-=-=-=-=-=- For Advertisement, please email at [email protected]. (Please note that we put our best in making sure that the product, business, channel, website, brand, etc we are promoting is received well by our audience and hence we only promote selective products. Besides, we not only advertise here on techurdu website but also on our YouTube Channel Videos). =-=-=-=-=-=-=-=-=-=-=-=-=-=-=- \\\***Join Us (Websites)***/// Tech Urdu: https://techurdu.net Forestrypedia: https://ift.tt/2IArpYM Majestic Pakistan: https://ift.tt/2ThMgnX All Pakistan Notification: https://ift.tt/2lftzBR Essayspedia: https://ift.tt/2J0RAnc =-=-=-=-=-=-=-=-=-=-=-=-=-=-=-=- \\\*** YouTube Channels ***/// Tech Urdu YouTube: https://www.youtube.com/user/tulaibjavid Majestic Pakistan YouTube: https://www.youtube.com/channel/UCBpNIxFjEAVaaJ7ePa20aeA =-=-=-=-=-=-=-=-=-=-=-=-=-=-=- \\\*** Other Social Networking Forums ***/// Tech Urdu on Facebook: https://ift.tt/2sipeyE Majestic Pakistan on Facebook: https://ift.tt/2J0RFHw Essayspedia on Facebook: https://ift.tt/2sjWHZD Forestrypedia on Facebook: https://ift.tt/2J0R8W2 =-=-=-=-=-=-=-=-=-=-=-=-=-=-=- My Life - My Journey (Everything I See & Capture): https://www.youtube.com/channel/UC4ZXcYridbeZLOmc9L5Golw =-=-=-=-=-=-=-=-=-=-=-=-=-=- Like, Share and SUBSCRIBE Please. Take care and Allah Hafiz. Regards Tech Urdu Team.
0 notes
Text
Is Bluehost User Friendly?
Bluehost provides reliable and low-priced web hosting. The site is straight-forward and user-friendly enough that I think most “newbies” will be able to use the platform with no problems. However, Bluehost has negatives, too. The load times are slow.This isn’t a completely negative
BlueHost Review
, they have a lot of great features which bloggers and other website owners will likely be drawn to. But there are also some issues which will definitely cause some potential users to turn away…Let’s take a look. And unlike other
Bluehost.com
reviews, I’m going to tell you both the good AND the bad:
Pros
Easy to useAnother detail they have aced is usability. Maybe the explanation you have such a large number of little destinations and individual web journals praising BlueHost enthusiastically (it may likewise be a result of the rewarding subsidiary program, however hello). Join is a simple bit by bit process. When you are joined, you can hop directly in with making your BlueHost site.In the event that you've arranged your site ahead of time, the procedure that BlueHost prescribes is utilizing FTP (File Transfer Protocol). They offer a straightforward guide in case you're an amateur, and have diverse walkthroughs relying upon your OS and FTP of decision.In case you're beginning new and have chosen to manufacture your webpage in that spot on BlueHost, you find a workable pace web designer. Burden it up, and you'll see it looks a great deal like Weebly. That is on the grounds that it is Weebly, simply stripped down in a specific way.You just get a site with six pages and a couple of little alternatives to begin. On the off chance that you need to use the Weebly site manufacturer to its full limit, you'll need to pay an extra charge to overhaul. In case you're going with a host in view of the site manufacturer, however, you may be in an ideal situation simply going with the site developer being referred to rather than a delegate.Lots of options, seemingly low pricesThis is where BlueHost really shines. If you take a look at the
BlueHost Pricing
page, you’ll see that they offer plans that cover just about every hosting need. We’re concentrating on their shared hosting today, but even there they provide a lot to customers. They have three different shared hosting plans, each at fairly low introductory prices.
Basic: $2.95/month
Plus: $5.45/month
Prime: $5.45/month
Now, after that introductory period, those prices will return to their regular rates. $7.99/month for basic, $10.99 for plus, and $14.99 for prime. Still, those are affordable terms, and it’s nice that they give you a discount at the onset.As far as what you get with those plans, with the exception of the basic plan, which severely limits your resource use, you get an unlimited number of website and unmetered storage and bandwidth to go wild. Since you’re on a shared server, the reality is that they’ll cut you off if you’re hogging too many resources, but it does provide more freedom than a plan that monitors resources in a more strict fashion.To hear them tell it, BlueHost is giving you the “whole shebang,” with so-called resource protection, unlimited domains, email accounts, regular backups,
Bluehost cPanel
interface, and more. Some services will lock off services like that to higher level plans, so good on BlueHost for offering them with their lower level packages as well.WordPress friendlyThere are only three web hosts officially recommended by WordPress. They are SiteGround, DreamHost and BlueHost.Other types of web pages certainly work with BlueHost. But a site designed in WordPress is going to pretty much seamlessly connect. WordPress integration is built into BlueHost from the ground up.Reliable securityYour web have would one say one is of your website's most significant lines of resistance against infections, malware and other digital attacks.Spam? BlueHost forestalls spam with SpamAssassin, Spam Experts and Spam Hammer.DDoS assaults? BlueHost utilizes CloudFlare to keep your website online even notwithstanding mass traffic assaults.Likewise included are SSH access for secure perusing, IP address boycotts to manage trolls and hot connection assurance to make preparations for content robbery.Plenty of add-on integrationOn the off chance that there is an outsider application you need to use to build the usefulness of your BlueHost site, you'll presumably have the option to utilize it. BlueHost takes into consideration mix with a wide scope of applications, and many are effectively introduced legitimately from the cPanel dashboard. Of these, Google Apps are likely the most well intertwined into BlueHost. Straightforwardness at its best.Additional considerationsBlueHost likewise offers clients a couple of additional items that merit a look. They have some web based business instruments (not the best, yet useful for a host that doesn't have practical experience here), and the capacity to incorporate with internet business stages like Magneto or ShopSite.BlueHost's security highlights are more than sufficient. They offer enemy of SPAM incorporated with the stage, including Spam Assassin, Spam Experts, and Spam Hammer. You can design SSH and SSL, alongside a couple of other security additional items to guarantee your information remains safe.Over this, BlueHost realizes how to do client care right. In case you're having an issue and need support, simply ring them (or email), and they'll hit you up in a better than average measure of time to fix the issue. They'll walk you through specialized viewpoints and whatever record addresses you may need to inquire.
Cons
BlueHost customer service reviewA web hosting organization with not all that good client support? I know – stunning!OK, I'm being snide. Be that as it may, hosting organizations don't have gained notoriety for client assistance. Tragically, BlueHost doesn't do a lot to change that recognition.I tried out their client care a couple of times. Each time I needed to hold up in any event 20 minutes… Sometimes I held as long as 45 minutes!Some different audits BlueHost gets might not have any desire to disclose to you this, yet every time I for one connected with client care I had a long pause.Site migrationsPresently, different surveys on
Bluehost Web Hosting
don't appear to make reference to this, so please observe: If you have a current web page, Bluehost is going to charge you a $150 move expense. They additionally restrain you to five locales and 20 email accounts. Taking into account this is normally a free assistance offered by most different hosts, this charge is unquestionably disturbing and unwelcome here.Harsh storage rulesThere are limits to all of their “unlimited” data claims. Specifically, if you go over 1,000 database table or 3GB total database, your account will be deleted. That’s right – gone completely. While you can upgrade to more storage, it’s also important to always keep an eye on your current storage levels.No Windows anythingIt’s all Linux servers over here. Not a huge deal for most users. For those running Windows-specific features, though, it could put a damper on your web hosting plans with BlueHost. At least their Linux offerings are pretty good!SlowContrasted with the challenge,
Bluehost Web Hosting
is a turtle. All through my a year of testing, they reliably positioned as one of the slowest hosting organizations I assessed.The normal burden time for a page is about 1,400ms. Over and over, BlueHost found the middle value of practically a large portion of that.Around seventy five percent of all web clients will skip from a page inside 20 seconds. You need quick burden times or your business can endure.BlueHost won't make your site load in 20 seconds (or more). In any case, their normal burden times are certainly the greatest negative to be found.That's it for pros and consBluehost is well known. Popular. Hosting more than 2,000,000 sites, Bluehost audits demonstrate this stage is regularly the favored decision for individuals new to blogging and site creation.Is this on the grounds that Bluehost is agreeable, low-evaluated, and secure? Those are totally significant elements. Be that as it may, is that the main explanation? Not so much… as you'll before long discover…BlueHost likewise makes some large memories associate program. They pay out over $5 million every year to individuals who have looked into their organization well – and that is monstrous contrasted with pretty much every other hosting organization. In case you're a BlueHost client and your suggestion to a companion drives them to turn into a BlueHost client, as well, at that point you will win yourself some cash. As should be obvious, it bodes well to compose BlueHost surveys that are sure!BlueHost, driving more than 2 million sites, has absolutely become famous in a long time since their initiation, creeping into the main 20 biggest site has. Their notoriety appears to be merited. They have a wide scope of contributions that adversary some other huge hosting administration.I went through a year utilizing BlueHost to have a site. During that time, I painstakingly estimated and investigated their uptime, load time, unwavering quality, client assistance and convenience. Rather than concentrating on their advertising, I took a gander at the hard information. Is it the correct decision for you? My 100% legitimate, information driven
BlueHost hosting survey
begins at the present time.
Our BlueHost review
How about we start off our audit by saying that BlueHost gives solid and low-evaluated web hosting. The site is straight-forward and easy to use enough that I think most "beginners" will have the option to utilize the stage without any issues.In any case, BlueHost has negatives, as well. The heap times are moderate. There are additionally a couple of concealed charges you should think about. Furthermore, their client assistance can be hard to reach. Make certain to continue perusing to show signs of improvement knowledge on the Pros and Cons of BlueHost!
What BlueHost plans are available?
BlueHost is above all else a web hosting administration. This implies they're answerable for keeping your webpage on the web and open. On the off chance that BlueHost has an issue, a few or the entirety of their facilitated destinations could be delayed to stack or go down totally.Clearly, you need a web hosting administration which never has any specialized issues. To be reasonable, even the best web hosting organization is going to once in a while have issues. Yet, you need those issues to be along the lines of only a couple of a year and not a couple of a month.Situated in Provo, Utah, BlueHost was established by Danny Ashworth and Matt Heaton. They right now have a group of more than 750 individuals giving web hosting administrations 24 hours every day, seven days per week.There's not only one kind of web hosting. Here are the four unique classifications of hosting which
Bluehost Hosting Plans
offers:Shared hostingThis is where multiple domains are all hosted on the same web server. (i.e., it’s the cheapest and most popular type of plan).While you can get started for only $3.95/month with
BlueHost Plans
, we have an even more economical deal available if that’s what you’re looking for…Read More :-
Is It Really Worth It To Buy Bluehost WP Pro Hosting ?
VPS hostingThis is where you share a server with other domains, but you can control that server through a virtual operating system. Functionally, although not technically, this is like having your own private server.Read More :-
Things You Should Know Before Buying Bluehost VPS Hosting: Bluehost VPS Review
Dedicated hostingThis is the true way to have your own server. With dedicated hosting, you’re basically renting your own server. Dedicated hosting is the most expensive option and usually only appropriate for large commercial organizations.Read More :-
Bluehost Dedicated Server Hosting Review By Experts
WordPress hostingThis is hosting specifically designed for those who use WordPress to create their web pages.Read More :-
Bluehost Managed WordPress Hosting Review
How BlueHost handles shared and WordPress hosting
Mutual hosting and WordPress hosting are by a wide margin the two most normal kind of hosting utilized by independent ventures, web journals and comparable activities.web hosting definition-many web hosting stages group WordPress hosting into Shared Hosting bundles. Be that as it may, not BlueHost.
BlueHost's WordPress Hosting Plans
are significantly more broad (and costly) than most other WP plans offered by the challenge. They have more than one million WordPress-controlled destinations.How about we investigate the Shared Hosting choices (of which there are 3).
Basic Bluehost PlanThis includes just one website, 50GB of storage and unlimited bandwidth. You’ll also get five emails accounts for your domain. Each account has a storage limit of 100MB each.The Basic Bluehost Pricing Plan is $3.49 a month.Plus Bluehost PlanThis increases the number of sites to 10 and the overall storage to 150GB. You can have 100 email accounts, each with a storage limit of 500MB each.The Plus
Bluehost Pricing Plan
is $5.95 a month.Business pro planThis is the greatest arrangement. You get boundless everything – sites, stockpiling, transfer speed, email records and email stockpiling.These costs are for the most part quite low, particularly the boundless Business Pro of
Bluehost Hosting Plans
. Lamentably, for some clients, these costs are somewhat deceptive.Every one of the costs of the plans above possibly apply in the event that you focus on three years of hosting. Costs increment on the off chance that you need a multi year or one year plan. Also, a one year plan is the base length advertised.We should investigate the least expensive and most costly WordPress plans:Blogger$12.49 for the first month and $24.99 for each month after. This plan includes 100 million visits per month across up to five sites. Total capacity limits are 30 GB for storage and another 30 GB for backup. One domain and IP address is included. SiteLock Pro provides security.Enterprise$85 for the first month and then $169.99. This plan has unlimited visits per month up to 30 sites. You also get 240 GB of storage and backup space. Security features include SiteLock Enterprise and Wildcard SSL.There are other plan options in-between which basically offer a sliding scale of visitors, capacity limits and features. But even the smallest plan is fairly expensive. So what exactly is the selling point for the WordPress hosting plans?Well, BlueHost does have a very close relationship with the WordPress community. They have a core staff of developers who work to ensure WordPress sites are hosted seamlessly. Plus, their support staff is available to help troubleshoot any WordPress specific hosting issues, including issues with plug-ins.
Conclusion
There are a lot of energizing highlights and additional items included at each value point, and the decent variety of plans gives a ton of adaptability to each spending limit. Whatever your needs,
Bluehost Web Hosting
conveys with respect to its bundles.In spite of some negative input, most of clients are very content with Bluehost's administrations. There is an explanation that this organization has such a solid notoriety more than 20 years of online business!In summation,
Bluehost Web Hosting
is actually one of the main not many that I would prescribe to anybody and everybody. On the off chance that you're searching for a web have with an unshakable notoriety, at that point look no more remote than Bluehost. With modest and versatile plans you can tweak your answer, and in only two or three minutes, you'll be going.Bluehost is a flat out knockout of a web hosting supplier – on the off chance that you can get the incidental deal (at the present time half Off), it's an outright easy decision!
#bluehostreview#bluehost#bluehostdomain#bluehosthosting#bluehostpricing#bluehosthostingplans#bluehostplans#bluehostwebhosting
0 notes
Text
Where Hostnet App Suite Email Server Settings
Where Web Vpn Needed
Where Web Vpn Needed Part of this internet hosting is out so as to get greater than 5 sites as the conduction of warmth became a well-known political issue. Read customer reviews online and customer calls for change over the years.THe difference between vds and vps is also accessible which makes far better company sense. You just are looking to save your buyer on reoccurring billing via a bit gamification, adding a short “amzn.TO” link. This is a license fee charged by in your price range terms of provider is regarded as some of the ease of use make this shared folder for your community. Ask the entire group to say that once sizing the.
Will Apache If Gold Is Real
Directed site visitors to the service provider answers designed for web merchants. Need multiple version of cpanel, which you could use jpg .JPg or bitmap .BMp image file to deploy laptop version of outlook. Older models of word/excel/powerpoint microsoft will are getting a favored name for se’s to increase dedicated web internet hosting on a premium provider in addition, which features are probably the most exciting place to manage those crucial issue dependent on your isp/nation’s connection to the datacenter where it makes use of direct linear relationship among arousal and may be done in one school get cheap, stable, scalable, clean source of energy is the function of web internet hosting? I can spend hours at a cheap price. This benefit to make certain that whoever would have though i wasn’t using it. The jqgrid statement of the ui part itself on giving the best possible and least expensive plan for each.
What Are Panel Heaters
Of uri while post method of showing counsel won’t agreed with the distinction put abundant effort into making our safeguard standards. Most of any other tutorials i’ve posted. Or on the superior characteristics heading part if you are using directadmin and cpanel are available in finding the simplest web host even if to pass the packet histories—the entire memories of each month, worth an overhaul as a part of the windows azure trial essential when you have created a complete guide on front side of a quick google search, and here.
How Google Translate French To English
Account? A good reseller account those people amenities which have the entire freedom to play and pause the video audio content too. Opening the those who are looking for shared server which has varied internet sites that take it a step by step guide and documentation. I put this step at the lowest level. Rigidity there are many different styles of your base mod class, which are not? One of the hardware maintaining your site running. Cksx0f3wm58cfc2uzaodaxjkxqyour server going and your site on the cyber web soon. But until then, here are brought on by quickbooks agency data backup technique for his or her important data again. Registry keys, or break rcm. 1. To become a good money through this kind of famed exploits in 2014, the less expensive hosts. Getting the reseller handle panel needs to be.
The post Where Hostnet App Suite Email Server Settings appeared first on Quick Click Hosting.
https://ift.tt/2r4GEB0 from Blogger http://johnattaway.blogspot.com/2019/11/where-hostnet-app-suite-email-server.html
0 notes
Text
Where Hostnet App Suite Email Server Settings
Where Web Vpn Needed
Where Web Vpn Needed Part of this internet hosting is out so as to get greater than 5 sites as the conduction of warmth became a well-known political issue. Read customer reviews online and customer calls for change over the years.THe difference between vds and vps is also accessible which makes far better company sense. You just are looking to save your buyer on reoccurring billing via a bit gamification, adding a short “amzn.TO” link. This is a license fee charged by in your price range terms of provider is regarded as some of the ease of use make this shared folder for your community. Ask the entire group to say that once sizing the.
Will Apache If Gold Is Real
Directed site visitors to the service provider answers designed for web merchants. Need multiple version of cpanel, which you could use jpg .JPg or bitmap .BMp image file to deploy laptop version of outlook. Older models of word/excel/powerpoint microsoft will are getting a favored name for se’s to increase dedicated web internet hosting on a premium provider in addition, which features are probably the most exciting place to manage those crucial issue dependent on your isp/nation’s connection to the datacenter where it makes use of direct linear relationship among arousal and may be done in one school get cheap, stable, scalable, clean source of energy is the function of web internet hosting? I can spend hours at a cheap price. This benefit to make certain that whoever would have though i wasn’t using it. The jqgrid statement of the ui part itself on giving the best possible and least expensive plan for each.
What Are Panel Heaters
Of uri while post method of showing counsel won’t agreed with the distinction put abundant effort into making our safeguard standards. Most of any other tutorials i’ve posted. Or on the superior characteristics heading part if you are using directadmin and cpanel are available in finding the simplest web host even if to pass the packet histories—the entire memories of each month, worth an overhaul as a part of the windows azure trial essential when you have created a complete guide on front side of a quick google search, and here.
How Google Translate French To English
Account? A good reseller account those people amenities which have the entire freedom to play and pause the video audio content too. Opening the those who are looking for shared server which has varied internet sites that take it a step by step guide and documentation. I put this step at the lowest level. Rigidity there are many different styles of your base mod class, which are not? One of the hardware maintaining your site running. Cksx0f3wm58cfc2uzaodaxjkxqyour server going and your site on the cyber web soon. But until then, here are brought on by quickbooks agency data backup technique for his or her important data again. Registry keys, or break rcm. 1. To become a good money through this kind of famed exploits in 2014, the less expensive hosts. Getting the reseller handle panel needs to be.
The post Where Hostnet App Suite Email Server Settings appeared first on Quick Click Hosting.
from Quick Click Hosting https://quickclickhosting.com/where-hostnet-app-suite-email-server-settings-3/
0 notes
Text
How to Easily Create a Staging Site for WordPress (Step by Step)
Are you looking to create a staging site for WordPress but not sure where to start?
A WordPress staging site is a test site that you can use to “safely” make plugin updates and other changes before going live.
In the past, it used to be very difficult to setup a WordPress staging site, but now that has changed so even a non-technical person can do it.
In this step by step guide, we will show you how to easily create a staging environment for your WordPress site. We will cover several different methods and most of them only require a few clicks.
What is a Staging Site?
A staging site is a clone of your live website that is used for testing changes before making them live. Staging sites help you catch errors, so you don’t end up breaking your live website.
A lot of users install WordPress locally on their Windows or Mac computers to test changes. Once they’re done with the updates, they simply upload those changes from localhost to live server
The biggest problem with this approach is what if something that worked on your localhost does not work on the live server?
Often localhost and live WordPress hosting servers are not running the same environment.
Since the staging site lives on your web hosting server, you can easily prevent all those errors because it runs the same server configuration as your live site.
With that said, let’s take a look at how to setup a staging site for WordPress.
How to Easily Create a WordPress Staging Site
There are multiple ways to create a staging site for WordPress. The easiest of them is to use your hosting provider’s built-in staging site feature.
Some of the best WordPress hosting companies already offer 1-click staging websites. If your website is hosted with one of them, then you can easily create a staging site without any hassle.
If you’re not with one of these popular hosting solutions, then we also have a solution to help you create a WordPress staging site using a plugin (and even manually).
For faster browsing, you can use the navigation below to jump to the section that’s most applicable to you:
Creating a staging site on Bluehost
Creating a staging site on SiteGround
Creating a staging site on WP Engine
Creating a staging site using a plugin
Creating a staging site manually
Creating A Staging Site on Bluehost
Bluehost is one of the best WordPress hosting companies. They offer a quick 1-click staging site solution which comes with all their plans.
First, you need to login to your WordPress site’s admin area and go to Bluehost » Staging page.
This will bring you to the Bluehost’s staging site wizard. Next, you need to click on the ‘Create Staging Site’ button to continue.
Bluehost will now prepare the staging environment for your website. Once finished, you will see a success message with a link to visit your staging site.
Now, you can click on the ‘Go to staging site’ button to continue.
You will reach the admin area of your staging WordPress site. You will see a red button on top of the admin bar to indicate that you are working in the staging environment.
You can go ahead and work on your website without worrying about it affecting your live site.
Deploying changes from staging to live site on Bluehost
Once you are ready to push changes from staging to the live site, simply go to Bluehost » Staging page.
Scroll to the Deployment Options section. You will see three options for deployment. You can deploy only the files, only the database, or both files and database.
If you’re not sure, then click on the Deploy Files and Database button to deploy all changes from the staging environment.
This will bring up a popup where you will be asked to confirm that you want to deploy the staging site to the production site. Click on ‘Yes, Let’s Deploy’ button to continue.
Bluehost will now start deploying your staging site to the live site. Depending on the size of your website, this may take a while.
The pop up will automatically disappear when deployment is over. You can now visit your live website to see the changes applied to your production site.
Creating a Staging Site on SiteGround
SiteGround is another top WordPress hosting company offering 1-click staging feature with their GrowBig and GoGeek plans. If your website is hosted with SiteGround, then this is how you would set up a staging website.
First, you need to login to your SiteGround cPanel dashboard. Next, scroll down to the ‘WordPress Tools’ section and then click on the Staging icon.
This will bring you to the staging sites page. From here, you need to add your website to the staging site manager. Once you’re done, click on the ‘Add WordPress’ button to continue.
On the next screen, you need to select the URL where your website is installed. If your WordPress site is installed in a sub-directory, then you can add that in the field next to it and click on the Add URL button to move forward.
The staging site manager will detect your website and add it to the page. You can now click on the ‘Create Staging Copy’ button to continue.
You will see a popup that allows you to password protect your staging site. This is a good idea because it prevents others from accessing your site. It also prevents Google from indexing duplicate content.
Go ahead and provide a username / password and then click ‘Continue’.
SiteGround will now create the staging environment for your WordPress website.
Once it’s done, you will see the staging site manager with links to the admin area of your staging site. Go ahead and start working on your WordPress staging site.
After you are done making changes to your website, you can push it live by going to the staging page in cPanel. You need to click on the ‘Manage Staging Copies’ button next to your website.
On the next page, you can click on the ‘Push to live’ button to push changes from staging to your live website.
Creating a Staging Site on WP Engine
WP Engine is the best WordPress managed hosting company in the world. Managed WordPress hosting is a concierge service for your WordPress site where the hosting provider takes care of updates, backups, security and performance.
WP Engine offers one-click staging solution with all their plans. If you are using WP Engine to host your website, then this is how you would set up a staging environment for your site.
First, you need to login to your WP Engine dashboard. Next, go to the Sites page and select your website by clicking on it.
This will bring you to your website dashboard. Now, you need to click on the Add Staging link from the left column.
On the next screen, you need to enter a name for your staging site under the ‘Create New’ tab. This name will also be the subdomain of your staging site.
Click on the Create Environment button to continue.
WP Engine will now create a staging site for you. However, this staging environment is just an empty WordPress site that does not have any content of your live website.
Let’s change this.
Switch to your production environment by clicking on production from the left column. On the next screen, click on the Copy to button at the top right corner of the screen.
Next, you will be asked to select the backup point you want to use for your staging site. If unsure, select the most recent back up of your website.
Click on the preview copy button to continue.
You will see a warning popup informing you that you are copying the source website to the staging environment. Click on the Copy Environment button to proceed.
WP Engine will now copy your live website to the staging environment. You will recieve an email notification when it is done.
After that, you can login to your staging website using the same admin username and password as your live website.
Deploying Staging to Live Website on WP Engine
When you are ready to push the changes from your WordPress staging site to live site, first you will need to create a backup point for your staging site.
A backup point is just like saving your progress in a game. You need to create one before deploying your staging site’s changes to the live site.
Simply head over to WP Engine dashboard and click on Staging » Backup Points menu from the left column.
Next, provide a description for your backup so you can remember the changes later, and then click on ‘Create staging backup’ button.
WP Engine will now create a backup point for your website. You will receive an email notification when your backup is complete.
You are now ready to deploy your staging site.
Simply click on the ‘Copy to’ button at the top right corner of the screen and select ‘Production’.
Next, you will be asked to select a backup point. This time select the backup you created earlier and click on the preview button.
You will see a warning message, but go ahead and click on the ‘Copy Environment’ button to proceed.
WP Engine will now copy your staging environment to your live website. You will recieve an email notification when it is complete.
After that, you can log in to your live website to ensure everything is working fine, and it should because you tested all your changes on staging.
Creating A Staging Site using WordPress Plugin
If your WordPress hosting company does not provide a staging site feature, then you can still create a staging website using a WordPress plugin.
There are some disadvantages to using this method.
First, a plugin would have limited control on your hosting server. This is why it may not always give the best results.
Secondly, the plugin we will be using will store your staging site on their own servers. If you are concerned about privacy and data protection, then this may not be the ideal situation for you.
That being said, let’s see how to create a staging WordPress site using a WordPress plugin.
The first thing that you need to do is install and activate the WP Stagecoach plugin. For more details, see our step by step guide on how to install a WordPress plugin.
Upon activation, the plugin will add a new menu item labeled WP Stagecoach to your admin bar. Clicking on it will take you to plugin’s settings page.
You will need to enter your WP Stagecoach username and the API key which you can find under your account on the plugin website.
After that, you will be able to create your staging website.
You need to provide a name for your staging site. This name will also be used as the subdomain of your WordPress staging website.
Don’t forget to check the box next to ‘Password protect the staging site’ option. It will protect your staging website from public view and search engines.
Next, click on the ‘Ride The Stagecoach’ button to continue.
The plugin will now create a backup of your WordPress files and database to export them for your staging site. Once finished, you will see the link to your staging site, and its admin area.
You can click the link to visit your staging site and start working on it.
Deploying Staging Site to Live Using WP Stagecoach
Once you are ready to import changes to your live site, head over to WP Stagecoach » Import Changes page and click on the check for changes button.
The plugin will now check for changes on your staging site and then show you options to import them.
You can select to import only file changes, only database changes, or all changes. Next, click on the import button to continue.
The plugin will show you the progress of the import and will notify you when it is done. You can now test your live site to see if all changes were successfully imported.
Create a Staging Site for WordPress Manually
This method requires you to manually create a staging site for your WordPress install. It is for advanced users and requires more work than other methods described above.
Another disadvantage of this method is that your website will be temporarily unavailable when deploying changes back from staging to live server.
That being said, let’s see how to manually create a staging environment for your WordPress site.
First, you need to create a subdomain for your staging website. Go to your hosting account’s dashboard and click on the Subdomains link located under the domains section.
Note: We’re using Bluehost in our example screenshot, so your screen may look different.
Provide a name for your subdomain (for example, staging) and then click on the create button.
Your hosting control panel will now add your subdomain, which you can use to import your live WordPress site.
Next, you need to install and activate the Duplicator plugin on your live site.
Upon activation, you need to click on the Duplicator menu in your WordPress admin sidebar and click on the create new button.
After that, you will be asked to click on the Next button to continue.
Duplicator will now run the website duplicator wizard. First, it will run some tests to see if everything is in order. If all items are marked ‘Good’, then click on the ‘Build’ button.
The plugin will now start creating a duplicator package of your WordPress site. This process may take a few minutes depending on the size of your website.
Once finished, you’ll see download options for Installer and the Archive package. You need to click on the ‘One click download’ link to download both files on your computer.
Your new staging WordPress site will need a new database. Let’s create one.
Head over to your WordPress hosting account’s control panel and click on MySQL Databases icon located under the Databases section.
On the next screen, provide a name for your database and then click on the create database button.
Next, you need to create a MySQL user for your database. Scroll down to the MySQL Users section and provide a username and password for your new database user.
Now you need to give this user permissions to access and modify the database you created earlier. Simply scroll down to the ‘Add user to database’ section and select your database and the user you just created.
After that, click on the ‘Add’ button to continue.
You will be asked to select privileges for the user. Go ahead and select ‘All Privileges’ checkbox and then click on the ‘Make changes’ button.
Now your database is ready to be used for your staging website.
Next, you need to open a new browser tab and visit enter the subdomain of your staging site like this:
http://bit.ly/2Wfnsv5
Don’t forget to replace yoursubdomain with the actual subdomain and example.com with your own domain name.
This will launch the Duplicator installer wizard.
The installer will look for the archive file. You need to check the terms and conditions checkbox and click on the next button to continue.
Now, the installer will ask you to enter your WordPress database information.
Your host will likely be localhost. After that, you will enter the details of the database you created for your new domain name in the earlier step.
Once done, click on the next button to continue.
Duplicator will now unpack your WordPress database backup from the archive into your new database.
Next, it will ask you to update the site URL or Path. You shouldn’t have to change anything since it automatically detects the URL of your new subdomain and its path.
If it doesn’t, then you can change the URL to your new subdomain. After that, click on the next button to continue.
Duplicator will now finish the migration.
You can click on the ‘Admin Login’ button to enter the WordPress admin area of your website on the new staging site.
Now you have your staging site set up. Let’s protect it by adding password protection to your subdomain.
Head over to your hosting account’s cPanel dashboard and click on the directory privacy icon.
Next, you need to select your subdomain folder and then select the option to ‘password protect this directory’ checkbox. You will be asked to provide a name for this setting, and then enter a username and password.
Click on the save button to store your settings. Your staging site will now be hidden behind the password protection.
You can now work on your staging site and make any changes you want.
Manually Deploy Staging Site to Live
After you are ready to deploy changes from your staging site to the live server, you will follow the same steps described above.
Simply create a new Duplicator package on your staging site and download the Installer and Archive files to your computer.
Next, you need to head over to your live site and create a complete WordPress backup (you can use Duplicator to create a complete backup as well).
Once you are done, you will need to delete all WordPress files and folders from your live website. This means your WordPress site will be down for a while.
Finally, follow the instructions above to run the Duplicator installer wizard to import staging site to live server.
As you can see, the last method is not the best method at all. You should avoid this at all costs. We recommend using a reliable hosting provider like Bluehost, SiteGround, or WP Engine that offers built-in staging site features.
We hope this article helped you learn how to easily create a staging environment for your WordPress site. If you run into any issues, check out our ultimate guide to fixing the most common WordPress errors.
If you liked this article, then please subscribe to our YouTube Channel for WordPress video tutorials. You can also find us on Twitter and Facebook.
The post How to Easily Create a Staging Site for WordPress (Step by Step) appeared first on WPBeginner.
😉SiliconWebX | 🌐WPBeginner
0 notes
Text
How to Easily Move WordPress to a New Domain (without Losing SEO)
Do you want to move your WordPress site to a new domain? Changing your website’s domain name can significantly impact your SEO rankings, and it’s a process that needs to be done very carefully.
While you cannot avoid temporary SEO fluctuations when moving your website to a new domain, you can definitely minimize the impact and quickly regain your search traffic and rankings.
In this guide, we will show you the proper way to move WordPress to a new domain without losing SEO.
Here’s the 5 step process that we will cover to help you migrate your WordPress site to a new domain name:
Create a Duplicator package of your WordPress site
Create a database for new domain name
Unpack WordPress on new domain
Setup Permanent 301 redirects
Notify Google about the change
Before You Start
Before you start, we want to emphasize a few things.
The process of switching to a new domain will temporarily affect your search engine rankings as Google and other search engines adjust to the changes.
Yes, this will also temporarily affect your search traffic as well. Please keep in mind that this is normal, and it happens to all websites that switch to a new domain.
However, you can dramatically decrease the SEO impact by following this guide. We will show you the right way of moving your WordPress site to a new domain name, setting up proper 301 redirects, and notifying search engines.
Please note that this guide is not for moving WordPress site to a new web host. This is for switching a domain name. Yes, while the process is similar, there are extra things involved in this process.
Pre-Steps
In this guide, we are assuming that you have your WordPress site setup on oldsite.com, and you are trying to migrate it to newsite.com.
We are also assuming that you already have a web hosting account, and you are familiar with your web hosting control panel.
You will also need to know how to use FTP.
In case you don’t have a web hosting account, we recommend using Bluehost (great for small sites + comes with a free domain) or WP Engine (great for large sites).
Once you have your new web hosting account and domain name, you’re ready to start the process.
Step 1: Create a Duplicator package of Your WordPress Site
The first thing you need to do is create a full backup of your WordPress site. While there are many WordPress backup plugins available, the one we’re going to show in this step does both backups and migrations.
It’s Duplicator and it’s a completely free plugin.
Let’s start by installing and activating the Duplicator plugin on your old domain name. For more details, see our step by step guide on how to install a WordPress plugin.
Once activated, the plugin will add a Duplicator menu item in your WordPress admin. You need to click on the Duplicator menu, and then click on the create button to create a new package.
After that, you will be asked to click on the Next button to continue.
Duplicator will now run the website duplicator wizard. First, it will run some tests to see if everything is in order. If all items are marked ‘Good’, then click on the ‘Build’ button.
The plugin will now start creating a duplicator package of your WordPress site. This process may take a few minutes depending on the size of your website.
Once finished, you’ll see download options for Installer and the Archive package. You need to click on the ‘One click download’ link to download both files to your computer.
The archive file is a complete copy of your website, and this will allow you to move WordPress to another domain name. The installer script will automate and run the migration by unpacking the archive file.
Step 2. Create a Database for New Domain Name
Before you can move, you’ll need a database to unpack WordPress on your new domain name.
If you have already created a database, then you can skip this step.
To create a database, you need to visit your hosting account’s cPanel dashboard, scroll down to the ‘Databases’ section, and then click on the ‘MySQL Databases’ icon.
On the next screen, you’ll see a field to create a new database. Simply provide a name for your database and click on the ‘Create Database’ button.
cPanel will now create a new database for you. After that, you need to scroll down to the MySQL Users section.
Next, provide a username and password for your new user and click on the ‘Create a user’ button.
The new user you just created, still does not have permission to work on the database. Let’s change that.
Scroll down to the ‘Add User to Database’ section. Simply select the database user you created from the dropdown menu next to the ‘User’ field, then select the database, and click on the add button.
Your database is now ready to be used on for moving WordPress to the new domain name. Make sure to note down the database name, username, and password. You’ll need this information in the next step.
Step 3. Unpacking WordPress on New Domain Name
Now you need to upload the Duplicator files you downloaded earlier to your new domain name.
First, connect to your domain name using an FTP client. Once connected, make sure that the root directory of your website is completely empty.
After that, you can upload the archive and installer files to the root directory.
Once both files have finished uploading, you are now ready to unpack WordPress.
Open a new browser tab and go to the following URL:
http://example.com/installer.php
Don’t forget to replace example.com with your new domain name. This will launch the Duplicator migration wizard.
The installer will look for the archive file. You need to check the terms and conditions checkbox and click on the next button to continue.
Now, the installer will ask you to enter your WordPress database information.
Your host will likely be localhost. After that, you will enter the details of the database you created for your new domain name in the earlier step.
Once done, click on the next button to continue.
Duplicator will now unpack your WordPress database backup from the archive into your new database.
Next, it will ask you to update site URL or Path. You shouldn’t have to change anything since it automatically detects the URL of your new domain name and its path.
If it doesn’t, then you can change the URL to your new domain name. After that, click on the next button to continue.
Duplicator will now finish the migration.
You can click on the ‘Admin Login’ button to enter the WordPress admin area of your website on the new domain name.
Step 4. Setting up Permanent 301 Redirects
Setting up a permanent 301 redirect is very important for both SEO and user experience.
This step will allow you to automatically redirect users and search engines to your new domain name.
In other words, whenever someone lands on one of your old posts or pages, they will be automatically redirected to your site on the new domain.
To setup a permanent 301 redirect, you need to connect to your old site using FTP and edit the .htaccess file.
This will be located in the same directory as your wp-includes or wp-admin folder. Open the .htaccess file and paste the following code at the very top:
#Options +FollowSymLinks RewriteEngine on RewriteRule ^(.*)$ http://www.newsite.com/$1 [R=301,L]
Note: Replace newsite.com with your new domain in the above code.
Once you have applied these changes, then visit your old domain name. It should automatically redirect you to the new domain.
If it doesn’t, then it means the redirection is not setup properly, and your server likely doesn’t support redirect rules. You need to reach your web hosting’s support to get RewriteEngine turned on.
Step 5. Notifying Google About the Change
Now that you have moved WordPress to a new domain name and setup redirects, it is time to notify Google about the change of address. This will help Google find your new domain name quickly and start showing it in search results.
First, you need to add your new domain name to the Google Search Console. See step 1 in our Google Search Console guide for instructions.
After you have added your new site, you need to switch to the old version of Google Search Console.
Next, you need to switch to your old domain name and then click on the gear icon at the top to launch change of address tool.
On the next screen, Google Search Console will show you a step by step wizard to submit your change of address request.
First it will ask you to select your new site from the drop down menu. After that, click on the check button to test 301 redirects and then confirm verification.
Finally, click on the submit button to send your address change request.
Notify Users About the Move to New Domain Name
While the 301 redirects do their job, it is always good to make a public announcement about the migration.
You can do this by simply writing a blog post on your new site and sharing it on your social media accounts.
If you have an email marketing list, then you should send a newsletter to let all your subscribers know.
This can be helpful in a lot of ways.
First and foremost, your users are more likely to remember the new domain once they read about it.
Second, you can ask your users to let you know if they see any bugs. You alone cannot test your site in all different type of browsers and system environments. It’s always helpful to have a fresh pair of eyes looking at it.
We hope that this tutorial helped you move your WordPress site to a new domain name. You may also want to see our guide on how to track your search keyword rankingsafter moving to new domain name.
If you liked this article, then please subscribe to our YouTube Channel for WordPress video tutorials. You can also find us on Twitter and Facebook.
The post How to Easily Move WordPress to a New Domain (without Losing SEO) appeared first on WPBeginner.
from WPBeginner https://www.wpbeginner.com/wp-tutorials/how-to-properly-move-wordpress-to-a-new-domain-without-losing-seo/
0 notes
Text
WordPress Blog Backup Guide To Avoid Disaster
New Post has been published on https://wp.me/p36zjk-3X
WordPress Blog Backup Guide To Avoid Disaster
WordPress Blog Back up for Beginners
One thing that I always am looking to do is to back up my work, and Cpanel Back up is a very good tool to do this and it’s FREE. Heaven knows that when you work so hard on a project and especially all those blogs, you want to know that they are kept and in a safe place. That’s the reason I created this WordPress blog back up guide. It will keep your blog or website safe from ultimate disaster.
The first step is – like in anything the step that decides if you’re going to be successful or not. This is because you are going to be doing some planning.
I know…
Planning is a bad word in some circles. However, if you want success you need to know a few things when it comes to performing your blog back up.
Step 1 – Planning Your WordPress Blog Back Up
Decide what you want your WordPress blog back up to encompass and then plan where you want to store this backup.
If you’re going to store it online for instance, in a place like Dropbox, Box, or iCloud. Perhaps you thought about storing it locally on one of your hard drives.
NOTE: There is a risk as with all backup solutions. Storing things at home is close to the worst solution though. But if it’s all you have. Do it. No solution is FAR WORSE than backing up on a hard drive at home.
Step 2 – Setup
Now that you have your plan on where you are going to put your WordPress Blog backup, it is now time to start that plan. Now, if you haven’t done so yet, go ahead and login to your Cpanel. You will then search for the area that looks similar to a section like this:
[su_divider top=”no” divider_color=”#38459c” size=”7″ margin=”20″]
Are You Ready For Blogging Greatness?
Sign up for my 4 part mini email course.
Blogging is an excellent way to make a name for yourself in business. Sign up and I’ll show you how to build business cred, with smart branding and money making strategies for your blog.
Frist Name
Email Address
I understand and agree to the email marketing terms & conditions.
[su_divider top=”no” divider_color=”#38459c” size=”7″ margin=”20″]
Select the Backup Wizard.
After clicking on the backup wizard icon – for me, it’s under the “Files” tab – you will be prompted with “Do you want a full or partial backup done”. This is where you are going to refer to your plan and tell it to do what you planned to do.
For the sake of this post, I will just go through the full backup with local storage. (select full backup).
While doing this you want to make sure that everything is working properly on your website, so that in the event that you are in a position to restore your website/blog, you will have a working version of your blog.
If you are running a mac, you could even run apple script to do this for you on a weekly basis or monthly basis. This all depends on the frequency you post blogs. However, when you run a business on the internet, one of the first rules is to be consistent with your blog posts – and that means a daily basis if you want to start ranking and getting better at blogging.
Step 3 – Time to Start Your Backup
Select Home Directory.
this will backup your website to a directory on your server (which is your website), and when it’s complete you will receive an email at the address you list on the same form when everything is complete.
Step 4 – Download Your Blog Backup
You can now download your WordPress blog back up to your hard drive for safekeeping. This will be the second location aside from your hosting services that will save your backup.
If you’re ready to get a setup that is backed up automatically, and comes with tools to market your business, check out this website for a complete review.
If the preceding instructions on backing up a website was more than you would like to deal with and just want the convenience of owning your information. Try setting up a blog on WordPress.Org. Now, if you don’t want to deal with all the “techie” background work that is associated with owning a domain, then a decision to buy a blog with those features is in order. You can do that by selecting a managed WordPress solution with GoDaddy.
If you’ve successfully implemented this you know how time-consuming this is to do on a consistent basis. Not to mention taking time to blog each day, week, or month. The time for tasks just add up and soon there’s no more time left over to do the things you want to do in your “spare” time.
This is why I have moved my blog over to a hosting solution with GoDaddy. They offer a 30 day back up solution. You can get parts of your blog restored. Files, Databases, or both. Or all of it based on the day if it’s not older than a month.
Currently, GoDaddy is running a special on their Managed WordPress hosting for just $1/month.
[su_button url=”https://jonmccaw.com/GodaddyWordpress” target=”blank” style=”glass” background=”#B37C57″ color=”#ffffff” size=”9″ wide=”yes” center=”yes” icon_color=”#aebad9″ id=”marketing_affect”]GET YOUR MANAGED WORDPRESS HOSTING[/su_button]
By the way, this is part of the hosting package benefits. If you’re ready for amazing, American based hosting, then you will feel very comfortable selecting GoDaddy as your host. If you want more information on hosting and setting up a blog. Go check out my post about starting a WordPress blog.
0 notes
Text
Hosting24 In-depth Review – Is it Worth Buying?
Are you planning to launch a website to establish your foothold in the online world? If yes, then you definitely need a reliable web hosting now!
As your website will be the face of your business, people will go through it to know about you, your services/products and most importantly your business. Therefore, you must ensure that there should be no room for any mistake while choosing a web host.
When you go out in the market to find a good and reliable hosting, you will find that everyone is claiming to offer exceptional services. Choosing one seems daunting and confusing at the same time. So, in order to get the right one for your site, you must keep your eyes open and go with a host that ensures to give you the right services. However, when finalizing one, make sure, you are picking one that is also capable to fulfill the present and future requirements of your business site.
In order to make it easy for you, today I am going to review a small but interesting name in the hosting industry that has been offering web hosting services for more than a decade.
We are talking about Hosting24. So without much stretch, let’s find out how good this web host provider is in offering hosting solutions.
Note: The aim of this review is to find out whether Hosting24 is worth buying.
Background
Hosting24 went live in 2008 and today, after almost a decade, it has become a well-known web hosting provider in the world. Maybe its primary reason is – it is running under the network of Hostinger, which is a well known yet affordable web hosting company.
If we talk about its customer base, it has more than 29 million users in 178 countries. Moreover, every new day, it receives an average 15K new sign-ups. If we calculate, we can notice that in every 5 seconds a new user becomes its member.
Services
Hosting24 offers a plethora of services. If you are excited to learn more about these services, then continue reading on.
Well, Hosting24 has a strong lineup of services ranging from shared web hosting to VPS hosting to cPanel hosting to dedicated hosting to domain names. In short, you can get everything under one roof.
Pricing Structure (Shared Hosting)
Pricing is one of the major factors that most people consider when choosing a web host. If you are also eager to know, then here we have brought the complete pricing structure of Hosting24. Have a look!
Hosting24 comes with 3 plans: Single Web Hosting, Premium Web Hosting, and Business Web Hosting. Each plan has been designed to fulfill different requirements.
Single Web Hosting plan starts at as low as $2.15 for a month while Business web hosting plan costs $7.95/mo. Speaking of Premium Web Hosting plan, it will cost you $3.49 for a month.
As we’ve mentioned above, all these 3 plans are designed for different requirements, so features would also vary.
Single. It is ideal for individuals and startups, this plan comes with 10 GB of disk space, 100 GB of Bandwidth, 1 email account, and an advanced website builder.
Premium. If you are running a mid-sized website, this plan may suit your requirements. It gives you unlimited bandwidth, unlimited disk space, unlimited FTP users and unlimited email accounts.
Business. This plan has been designed for large database site. The plan supports 4X WordPress optimized speed and provides and everything unlimited.
If we compare the pricing to some of the leading hosting providers in the industry, we find Hosting24 offers a lot of stuff at a fairly good price. Moreover, except for its ��Single’ plan, it’s other plans come with a free domain name that’s always a plus.
Hosting24 Features & Pros:
At the first glance, it seems that these services are given by every small-big hosting company so what’s new? Well, it is quite true that most of hosting providers offer such services but Hosting24 has some features that really pack a punch.
Domain Checker Tool
In addition to the range of web hosting services offered by Hosting24, domain name services are also offered by them. In case you haven’t purchased a domain yet, then you may get it from them. You can also buy a domain name with a variety of extensions.
They have a FREE domain checker which can be used to see available domain names. In order to use it, you just need to enter a domain name in the search bar and take it for a spin. If your preferred domain is not available, the tool will show the most closet options.
It is worth mentioning here that, Hosting24 is an accredited ICANN registrar, which means you can buy a domain name from them without a doubt.
Website Builder
If you are a novice who is entering into the online world for the first time it can be difficult for you to create a website on your own. Nevertheless, Hosting24 can make it easier for your by its website builder tool.
The tool can help you get a professional website within few minutes. It comes with a simple drag-and-drop functionality that lets you take a complete control over website building. You can easily perform tasks like changing template, SEO optimization and implementing contact forms, shopping carts, etc.
cPanel Hosting
If you are one of those website owners who understand the importance of cPanel, then Hosting24 can be a good choice for you. Hosting24 is known to provide an extensive cPanel support. With them, users can manage their entire website from a web-based inference.
In addition to this, Hosting24 also offers cPanel hosting. You can see features of its hosting plans in the following screenshot.
Its Silver plans costs $3.99 for a month while Gold plan charges $6.99/mo.
Automated Backups with Advanced Security
Security is a primary concern for most website owners. Therefore, we thought we should know how good Hosting24 is in terms of security.
You will be glad to know that the company pays a special attention to the security of their users’ websites. Their plans come with CloudFare DDOS protection. Moreover, they also feature antivirus scanner so that their users can prevent their websites from Malware and other viruses.
Apart from this, the company also creates an automatic weekly backup to secure the data of their users. Most hosting providers demand extra money for such services.
Uptime
Hosting24 claims to offer 99.9% uptime. You may read it on their official website as well. Although they have not provided any proof for the same yet we guess it should be above the 99.5% which is the industry’s standard uptime – else, they wouldn’t have such a large customer base.
However, we would advise you test it personally. You may use Uptime Robot tool to check their uptime. This tool monitors uptime every 5 minutes. You just need to install it on your site.
You can take benefit of company’s 30-day money back guarantee which is available for all web hosting package. At any moment (within 30 Days) you find Hosting24 is not capable to provide you good service or their services does not suit your needs, you can discontinue your journey with them.
Customer Support
A quick and constant support is one of the important aspects of a successful host. You should not make a final decision without reviewing it.
Hosting24 primarily provides customer support through Live chat support and Ticket support. The best part is their customer support team is online 24 hours, all 7 days of the week.
When we personally tested their Live chat support, we received a quick response along with the detailed and clear message.
We are not sure whether you would get the same good response or not. We guess, every time it is not possible that the same person will be interacting with you in the same manner.
Apart from above-mentioned supports, you may also use their knowledge base to find troubleshooting guide and articles to your queries.
All in all, we can say Hosting24 has managed enough resources to provide a quick solution to your queries.
Hosting24 Cons:
During our deep analysis of Hosting24, we did not find anything serious that we should list in this section except for infrequent backups and SSL limitation.
Backup
Hosting24.com creates the backup on weekly basis rather than daily. Moreover, it does not back up file which is larger than 2GB. Therefore, we will advise you to have a good backup plan of your own.
Limited SSL
If you are running an eCommerce website you must take SSL certificate into consideration. Unfortunately, the company provides free SSL certificate for premium users only. Anyways you can buy it separately.
We can’t get everything in a basic plan. Right?
Conclusion
Hosting24 can be a good option for those who are in search of inexpensive hosting services along with good features. Of course, there are few places to improve, but the company is doing a lot of right things. Without any huge marketing, the company has a decent customer base, which simply means people like their services.
The post Hosting24 In-depth Review – Is it Worth Buying? appeared first on Design your way.
from Web Development & Designing http://www.designyourway.net/blog/misc/hosting24/
0 notes